Quantcast
Channel: DiskTuna // Photo Repair & Photo Recovery
Viewing all 281 articles
Browse latest View live

AV False positives are a plague, specially those by AI

$
0
0

This post if about the power of big tech companies like Microsoft (I have had similar experiences with Google), and also about the human touch being replaced by AI. About artificial intelligence make decisions, and the failure to provide effective channels to correct mistakes made by AI.

I normally never beg for up-votes, shares or likes. However if you want to help small developers, please share this post! Make AV companies aware that flaws in their software are not without consequences. That leaving decisions to AI without human backup is not the way forward!

I like to see myself as an honest person, making honest software. I am not a brilliant programmer but I give it my best. I try to learn as much as I can about the problem it tries to tackle or to help you tackle. I once made the mistake of letting one of my tools to ping my web server so I could see how often the tool was run. People didn’t like this, wondered why it needed to connect to the internet. And so I removed it. The software tries to do what it is supposed to do. Scan a drive. Load a JPEG. Nothing more and nothing less. Maybe not the best software in the world, but honest software.

Submit a false positive and get a free license.

What I need you to do: Download JPEG-Repair. You may need to tell Defender or other AV software to ignore the ZIP. Disabling Cloud protection for a second may work too.

Instructions for Defender: Goto https://www.microsoft.com/en-us/wdsi/filesubmission. A Microsoft account is not required. Submit as home customer. Upload the ZIP file you downloaded from this website.  Select ‘Incorrectly detected as malware/malicious’. Confirm submission (you may need to fill out Captcha).

At the bottom of the page there are more URL’s to AV vendors to which you can report a false positive.

Make a screenshot clearly showing the submission ID. Email me that screenshot and get a free license. The license is for personal use only and can not be shared with others.

If you are using a different AV product, email me the screenshot of the detection and the finished false positive submission form to get a free license. The license is for personal use only and can not be shared with others.

So, in short: Provide me with evidence of the detection and of you having submitted the file to the AV vendor of the software that detected it. 

These are instructions for Windows Defender. To run JpegDigger.exe and JPGRepair.exe despite the (false) warning:

  1. Open Windows Defender Security Center.
  2. Click Virus & threat protection.
  3. Click the Virus & threat protection option.
  4. Under “Exclusions,” click the Add or remove exclusions option.
  5. Click the Add an exclusion button.

Windows Defender false positive

Unfortunately, sometimes my tools are falsely detected as malware by major anti virus and security software. Without exception they’re ‘flagged’ by the heuristic or AI portion of the AV software. This heuristic or AI (artificial intelligence) is supposed to learn to recognize malware so it can detect threats it has never seen before. Artificial intelligence may sound sophisticated, but it’s basically trying to come up with rules of thumb to distinguish innocent software versus malware.

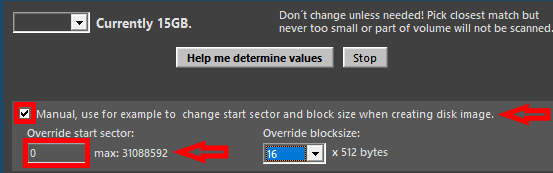
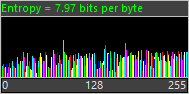
Simple rules of thumb could be ‘is the software relatively unknown’ (my software is, but specially after I just released an update), or are certain strings present in the software like encrypt, bitcoin, hash, decrypt – my software does several hash and encryption routines when handling the registration key. JpegDigger also tries to figure out if a drive it’s scanning possibly contains encrypted data. Is the software accessing the internet, what is it trying to access on the internet (again, simply scan for URL’s), those type of things. Or, is the software trying to mask it’s accessing the internet? JpegDigger and JPEG-Repair do not access the internet unless you click a help link (like more info). I try to make it obvious these are URL’s by mimicking URL’s in web browsers, in blue and under-lined.

I can see how this can work, I can also see how these rule sets can cause innocent software to to flagged as malware. This is bound to happen and it can not be avoided. I accept this as a fact of life.

But then, when I become aware of my software being flagged because I notice this when scanning it in VirusTotal or a user notifies me, then I should be allowed to appeal this in a straight forward fashion (false positive submission). And I also expect AV software vendors to treat such requests with some sense of urgency. As I write this I am waiting for 3 days already for Microsoft to process a false positive report!! I find this unacceptable to be honest. If you decide to relay the decision on whether something is malware or not to AI (Microsoft claims this), then you need human backup to quickly correct mistakes made by the AI.

It will not come as a surprise that processing of false positives can be expedited by paying Microsoft for it.

Microsoft touts about it’s cloud delivered AI to protect your PC. Practice shows this AI can be flawed and there’s no effective backup mechanism to appeal AI decisions in place.

Stop whining, just file a false positive report

Now you may think, Joep stop your whining, there are bigger problems to worry about. But for me, this is quite an issue. This is kind of the equivalent of a security guard standing in front of my store and denying potential customers because he ‘thinks’ they look like they may have malintent. And you as a potential customer are sent away and denied access to my store against your will. So you see how this affect both you and me.

Frustration levels rise when the portal you can use to submit false positives appears flawed itself. You can tick whether you’re reporting a suspected virus – or – a suspected false positive. I of course pick the false positive option because I know my tools aren’t malware. The summary page however consistently shows ‘user opinion: malware’, which is NOT what I selected.

Why does this hit small developers

I do not mean short people. I mean developers that aren’t backed up by loads of cash an fancy lawyers.

This false flagging is a fact of life for virtually all small developers: The files they produce are relatively unknown, specially after just having updated them. The domain from which they distribute the files is relatively unknown. The cost of a digital code signing certificate may not outweigh the gain. They may program in a more obscure or older programming language. This language may be popular among writers of viruses and Trojans and whatnot.

So then what happens next .. Say you want to download my tools and Windows Defender or whatever they call it these days pops up with a warning. It tells you the software is dangerous and it quarantines it. You’re one of those kind people that sends me an email to make me aware if this. I assure you the software is not and does not contain malware and you believe me. I then explain you how you can tell Defender to ignore my program. And of course you discover nothing bad happens. My tools do not keep your data hostage, does not phone home, none of that. So now you know your anti virus program can be wrong.

Maybe you decide to disable ‘cloud intelligence’ all together, because that’s where Defender’s most false positives originate.

A virus slipping through (false negative) just as well as a innocent program being blocked (false positive) both illustrate the touted Cloud delivered AI is not perfect. Any of those happening should be reason for Microsoft to swiftly correct errors to maintain and restore trust in the product.

I have had similar issues with Google. An utterly frustrating experience due to lack of ways to contact any human being within those large tech companies that can actually help you. Seems a law of the universe, Large Tech is actually evil.

https://coolsoft.altervista.org/en/blog/2018/05/antivirus-false-positives-are-plague-small-developers

http://straighttips.blogspot.com/2019/12/virustotal-report-false-positives.html

https://blog.nirsoft.net/2009/05/17/antivirus-companies-cause-a-big-headache-to-small-developers/

https://weblog.west-wind.com/posts/2016/oct/05/dealing-with-antivirus-false-positives

https://softwareengineering.stackexchange.com/questions/191003/how-to-prevent-my-executable-being-treated-from-av-like-bad-or-virus

https://stackoverflow.com/questions/40960407/my-c-sharp-program-is-detected-as-a-virus

Anti-Virus “False Positives”

Spotlight on security: The Curse of the False Positive

Reporting a false-positive

I recommend reporting a false-positive directly to your anti-virus vendor.

Here is a list of some vendors and their instructions for reporting false-positives:

The post AV False positives are a plague, specially those by AI appeared first on JPEG Repair | Photo Recovery | File Recovery | Video Recovery.


Wondershare (RecoverIt) gets the boot from majorgeeks.com

$
0
0

It’s no secret that I am not a fan of Wondershare’s RecoverIt. I think it’s a very poor, over hyped tool. And yet you see it pop up it’s ugly face everywhere, despite the fact you can get get superior software for less money.

Now, in my opinion there is nothing wrong with affiliation programs. In fact I am affiliated with most vendors of data recovery tools. I am affiliated with ReclaiMe, R-Studio, Easeus, you name it. So the fact I am a ReclaiMe fan has not much to do with me being affiliated to them, but all the more because I have objective reasons to love their product.

There is also nothing wrong with trying to get some attention for your product. I take time to browse the web and see if there’s any websites that might be interested in mentioning my tools. For example, I dropped geckoandfly.com a mail when I saw they listed several JPEG repair tools, and I am glad they now list JPEG-Repair there too. But I am a one-man-show and don’t have much time to dedicate to such activities.

Now, the fact you see certain tools pop up literally everywhere is not s much a testimony to their quality and effectiveness, but all the more a matter of money. The Stellar’s the DiskDrill’s and the RecoverIt’s are all over the place because they invest money into their marketing. Again, there’s not anything per se wrong with that, but it is good to be aware of that. Where it becomes absolutely dubious of course is paying money to influence ‘editorial’ content.

Why, oh why would anyone buy RecoverIt?

Why would anyone buy RecoverIt? Or DiskDrill? Or Stellar Data Recovery? Because it’s in their face! I think it can only be explained by one thing: effective ‘marketing’. And by that I mean buying your way into places and content people are likely to visit. I think, 9 out of 10 of the positive reviews you see on the web are either paid for, or the reviewer get’s a cut form each copy purchased via his website. The remaining 1 out of 10 is a review done by a person who doesn’t know what he’s talking about.

But never the less, these effectively marketed tools are every where. They’re not hard to find, in fact it will be often the first data recovery tools you will find.

Today in Twitter I saw an interesting tweet from the maintainer of the website www.majorgeeks.com.

It’s an illustration of a couple of things.

  1. Majorgeeks.com shows integrity.
  2. An example of Wondershare buying it’s way into editorial content. This is their m.o..

This is the entire mail

Confession time

Wondershare

I have received similar offerings from Wondershare.

Unlike Tim, I confess that don’t give them no for an answer. I instead quote them a price, and make it absolutely clear to them that this will be a thorough and honest review. I refer them to a video I made on their photo recovery tool in the past, which wasn’t very favorable. I never heard from them again.

Stellar

And here we have Stellar making a similar proposition via LinkedIn:

He kept pushing me to review their latest version of Photo Recovery, sent me a license to test with. As this is a kind of a hobby of mine (because I love data recovery software) I ran it against a batch of memory cards and card images. Real world cases, not some made up scenario by a ‘reviewer’. Those cases that typically end up at my desk because people already tried all the usual suspects. As expected the new version of Stellar failed spectacularly. Not missing a few files, no not detecting any files on cards I did actually manage to recover all data from. I relayed my results back to Mr. Yadav, and asked if I could have technical support to resolve these issues, to never hear from him again up to this day.

CleverFiles (DiskDrill)

Another example. CleverFiles is the maker of DiskDrill. I did a review on their data recovery product and of course they’re not very happy with that. I put a lot of effort into it. Not only into testing but I even edited their annoying mascot so it had a sad face and was wearing dark glasses to suggest it was blind. The article is one of Google success pages.

The previous marketing manager of CleverFiles responded b deactivating my affiliate account. But of course this doesn’t make the blog post go away. The other week I received an email from the new PR manager.

It appears she took the time to glance over my website, commenting on my dog. Now again. I have nothing against her contacting me. She is not asking me to do anything illegal or immoral. She’s not offering bribes, she’s simply asking for a second chance. But what it does illustrate in my opinion is that these companies have the funds to dedicate people to follow up on this type of content that may hurt their product’s reputation.

Conclusion

So, IMO the conclusion must be that people buy RecoverIt, Stellar Data Recovery and DiskDrill because they’re effectively marketed, and as a result are hard to miss. And again IMHO it illustrates that the tools are easiest to find are not because of them being the best solutions, but because they’re backed up by companies that are able and willing to, to push their products.

The post Wondershare (RecoverIt) gets the boot from majorgeeks.com appeared first on JPEG Repair | Photo Recovery | File Recovery | Video Recovery.

Windows Photos: It looks like we don’t support this file format

$
0
0

Windows Photos: “It looks like we don’t support this file format.”

The first thing you need to check is if other photo viewers can actually open the file. For example try the ‘old’ Windows Photo Viewer or a third party photo viewer. If those fail to open the photo as well, the file may be corrupt.

If you are trying to open a RAW image (Canon CR2, Nikon NEF etc.) also try the software from the camera manufacturer. It should support the latest versions of the RAW files.

So:

  1. Make sure you have installed the latest Windows Codec Pack.
  2. Try different software, for example this.
  3. Try camera manufacturer software and codecs. Sony | Canon | Nikon | Pentax | Olympus | Leica
  4. Make sure you are using latest version of the software that supports latest camera models.

If all fails to open the photo, you can try what software like JEPG-Repair Toolkit can do for you.

Windows Photos: It looks like we don't support this file format

Windows Photos: It looks like we don’t support this file format

If the photos are the result of undelete, file recovery

A lot of people that contact me with this issue are trying to open photos that were recovered from a memory card for example, using software like Stellar Photo Recovery, Easeus or Recuva (etc.). In that case it is likely the photos have been incorrectly recovered. A photo can only be repaired if it actually contains most of it’s original data. Rather than repairing such photos it makes more sense to try to recover them again.

My specialized recovery software was created typically for this type of scenario: JpegDigger:

JpegDigger is the result of many real-world cases that came to me via my photo repair service. I use it to solve problems that other software can’t on a daily basis. So even if you tried other tools, it’s worth giving it a try.

JpegDigger detects JPEG & RAW – NEF (Nikon), CR2 (Canon), ORF (Olympus), RW2 (Panasonic-Lumix), ARW (Sony) and DNG (from a Leica Q2) support. Note: Should work with all TIFF based RAW photo formats. Detects non-TIFF Canon CR3 and Fuji RAF.

The JpegDigger output format is JPEG. This means a 6000×4000 CR2 file is recovered as a 6000×4000 JPEG. JpegDigger has the ability to skip corrupt files or include them and repair them to a degree where a photo viewer can open them. It tries to reconstruct fragmented photos and allows for manual reconstruction of your photos.

Manually selecting clusters to reconstruct a photo

If all photos on a memory card are corrupt

If all or virtually all photos on a memory card are corrupt (to a degree where you can not open them) there is a chance that not the individual photos are corrupt but the file system. In case it is caused by file system corruption, the issue is that the directory can still be found (so you see file names etc.) but pointers to the files are incorrect. Do not try to solve this using chkdsk!

Instead download JpegDigger and allow it to scan the memory card. Use override to have it ignore certain file system parameters. The example below shows corrupt photos on a USB drive with a corrupt file system which were all recovered intact. Slightly different file system corruption can for example result in generic thumbnails which typically result in the infamous ‘It looks like we don’t support this file format’ message when you try to view an individual photo in Windows Photos.

Your first instinct may be trying to repair these obviously corrupt photos. But these were actually *recovered* intact from the memory card!

If individual photos are corrupt

‘It looks like we don’t support this file format’ is what I call a catch all error message. It means there is ‘some’ problem that prevents Windows Photos from opening the file. It does not tell us what is wrong with it. It is not by definition that you can repair such a file.

To aid in repair and diagnostics of corrupt photos I made a tool called JPEG-Repair. I use it on a daily basis to repair photos that customers uploaded to my photo repair service.

Experience learns that this error indicated some problem in the photo file header. This problem however may be a single byte with an erroneous value but it can also mean the entire header is corrupt. Even more severe is if corruption extends into actual image data, but even then not all is lost: As long as some image data is present, partial repair is still possible.

Worst case scenario, and I see this quite often unfortunately, is when the photo is an ’empty file’. What I mean by that is, although the file may have a valid name and size etc., it’s contents only exists of zeros or a repeating byte pattern then you open the file in a hex editor. When you attempt to repair such a file using JPEG-Repair, it will show an entropy value of 0.00 bits/byte for the file.

This photo contains only zeros and can not be repaired

This photo contains only zeros and can not be repaired

JPEG header corruption

In my experience the easiest way to test this assumption and repair the file in one go, is by replacing the entire header with the header from a known good file. This can be done using a hex editor, but my tool JPEG-Repair simplifies this procedure. JPEG-Repair also strips the donor header from data is specific to the donor photo or the reference file. For example, if you’d use a hex editor, the repair photo still embeds the thumbnail preview of the donor.

RAW photo header corruption

In this case the method is different. Header repair of RAW photos (CR2, NEF, ARW etc.) is rather difficult as each camera manufacturer takes the TIFF format specification as a start point and then modifies it. Unlike with JPEG, often it’s not simply a matter of transplanting the header. I am not aware of any photo repair software that actually repairs RAW photos even though some claim they do without further explaining what it is they do.

What I am hinting at are tools like Stellar repair for Photo and Kernel Photo Repair. Rather than repairing the RAW photo they try to extract a JPEG from it. In my tests these tools under performed: They either failed (Kernel) or often extract low resolution JPEGs.

Still, extraction of JPEG is in fact often the maximum achievable when it some to corrupt RAW photos and very often it is possible to extract a high resolution JPEG. My tool JPEG-Repair’s extract tool allows you to do this, in batch, and while skipping lower resolution JPEGs.

Damage extends beyond header into image data

The header of a photo is normally only a tiny portion of the file. If it gets corrupted it is not unlikely at least some of the image data is too. In such cases simply repairing or transplanting the header will not work or is not enough. In addition we need to get rid of the corruption in the image data too.

This type of repair can be done with JPEG-Repair although it can not be done in batch mode as it requires some manual intervention. In below example we see the header of a reference file made the photo visible. We now need to manually remove the corrupt data at the top of the picture. In below example it labels this corrupt data as ‘encrypted data’ as the photo in this example was partially encrypted by ransomware. But actually we don not care how the data became corrupted, we just need to get rid of it.

The same image after I removed the corrupt portion. By now adding ‘stuff bytes’ from the same position the bytes were removed from, we can shift the image back.

I have also successfully applied this same method on RAW photos that were affected by this ransomware, the wide spread STOP/DJVU family.

Conclusion

Whether a corrupt photo resulting in the error message ‘It looks like we don’t support this file format’ all comes down to: Does the file still contain (part of) the original image data. JPEG-repair helps you determining that by showing you the entropy value and a byte histogram:

Healthy entropy and histogram

File filled with pattern(FF)

A zero filled file

Some repairs can be ‘batched’: JPEG header transplantation and extraction of full resolution JPEGs from corrupt RAW photos. If damage extends into actual image data human intervention is required.

The following video show cases the repairs mentioned in this post:


The post Windows Photos: It looks like we don’t support this file format appeared first on JPEG Repair | Photo Recovery | File Recovery | Video Recovery.

JPEG restart markers to the rescue

$
0
0

Restart markers make the difference

This YouTube channel by my friend and colleague Nguyễn Vũ Hà has many great examples of JPEG-Repair being used to repair STOP/DJVU ransomware affected files. This video in particular is a great showcase on how JPEG restart markers prevent corruption propagating through the JPEG image stream. As you can see this is a JPEG with restart markers (4/720) which give it excellent survivability in case of corruption. Again, normally JPEG data is one single stream. One corrupt byte affects the rest of the stream that follows this byte too. In case of restart markers, the stream restarts itself at regular intervals (at every n MCUs, n being specified in the header), interrupting corruption preceding it.

In this video JPEG-Repair is used to merge a reference header to the JPEG data, then to remove corrupt data and the result is a near perfectly repaired photo.

Compare to this video from the same channel of a repair of a photo with the exact same type of corruption. Even once the corruption has been removed, from the stream, the rest of the stream suffers from color degradation and image shift. The end result is a presentable photo, but the quality is less than that of the photo with restart markers.

The post JPEG restart markers to the rescue appeared first on JPEG Repair | Photo Recovery | File Recovery | Video Recovery.

Leapp refurbished iPhone 8 – Binnen maand stuk (Dutch article)

$
0
0

Leapp refurbished iPhone 8 = als nieuw (niet!)

leapp.nl to good to be true

De hel genaamd Leapp.nl ..

Tsja, het lijkt een sympathiek idee. Een 2e hands iPhone, echter helemaal nagekeken en met garantie. Ik heb zelf niets met iPhone or Apple, maar het is een mode-ding onder tieners, dus dochterlief wil er een. Een refurbished iPhone lijkt de ideale oplossing.

Bestellen via Leapp is makkelijk. Hoewel ik geen ‘verzonden’ notificatie heb mogen ontvangen is de iPhone 8 (349 Euro) binnen een dag in huis.

Wij kozen voor het midden model, ‘licht gebruikt’, maar ik moet zeggen, hij ziet er werkelijk uit als nieuw.

Maar dan! Trouble in paradise! Goedkoop = duurkoop

(Nou ja, goedkoop .. Toch altijd nog 349 Euro .. Voor iets dat het niet doet)

Spontaan uitvallen, dan uren niet te gebruiken tot de telefoon zichzelf weer aanzet.

Binnen een maand begint de iPhone kuren te vertonen. Kuren van een dusdanige aard dat de telefoon eigenlijk niet meer bruikbaar is. Ik stuur een mail naar Leapp vergezeld van aankoop bewijsje, met het voorstel het toestel terug te sturen en per ommegaande een werkend exemplaar terug te krijgen.

Maar zo werken de Leapp protocollen niet. Leapp stuurt geen werkend exemplaar, Leapp repareert de telefoon! Als je wat ‘rond-googled’ leer je al snel dat er weken over zo’n reparatie heen gaan. Ik vind het niet redelijk om weken te moeten wachten op een reparatie, na minder dan een maand te hebben mogen genieten van een aankoop. Bovendien zijn telefoons voor tieners niet zomaar ‘spele-dingetjes’, het zijn life lines die bovendien ook dagelijks worden gebruikt voor serieuze zaken. Zo’n beetje alle communinicatie met school verloopt via dat ding. Alle roosters and huiswerk opdrachten lopen via dat ding. Een wekenlange reparatie levert veel overlast op.

Ik blijf aandringen op vervanging. De reacties van Leapp zijn verwarrend. Medewerker 1 stelt dat Leapp met reparatie aan zijn wettelijke verplichting voldoet. Medewerker 2 geeft aan dat voor dat wordt overgegaan tot vervanging de telefoon gecheckt wordt op val, stoot of vocht schade. Dit suggereert dat ze wel willen vervangen. Dit gebeurt in het reparatie centrum en duurt even lang als een reparatie, lood om oud ijzer dus. EN dan zijn er ook nog medewerker 3 en 4, maar het is een beetje overbodig ze allemaal aan het woord te laten. Ze tappen allemaal uit het zelfde vaatje met standaard copy/paste antwoorden.

Ik ben geen jurist en technicus, maar m.b.t. het laatste lijkt me dat val, stoot of vocht schade redelijk snel moet kunnen worden vastgesteld. Ook is het volgens mij zo, dat wettelijk gezien bij gebreken die optreden binnen 6 maanden na aankoop, aangenomen mag worden dat het een apparaat betreft dat reeds bij aankoop gebreken had. M.b.t. reparatie moet de overlast beperkt zijn. Zoals ik al eerder zei, is de overlast aanzienlijk aangezien de telefoon voor school min of meer noodzakelijk is.

En daar bovenop ben ik van mening dat er los van wettelijke bepalingen nog zoiets als ‘goede service’ bestaat. En wat mij betreft houdt dat in dat men uit gaat van goeder trouw, en verder dat wanneer een duur product dat binnen een maand kapot gaat gewoon een nieuw, vervangend toestel wordt verstrekt. M.a.w. Leapp.nl levert een waardeloze service.

Je zou kunnen stellen dat de iPhone helemaal niet goed nagekeken is en dat men dat nu alsnog gaat doen, in mijn tijd. De m.i. logischer weg is, toestel vervangen en dan kan Leapp.nl alsnog het toestel nakijken en geschikt maken voor verkoop. Ik heb snel een vervangend toestel en Leapp moet dit toestel toch al nakijken en repareren. Of ben ik nou malle wappie?

Refurbished, ik ben voor maar koop niet bij Leapp.

Ik koop heel vaak tweede hands. Ik koop vaak refurbished. Ik koop graag het model waar al een krasje op zit of een deukje in zit. En ik heb daar prima ervaringen mee. Ik zal dat ook blijven doen. Maar nooit meer bij het waardeloze bedrijf Leapp.nl.

Ik adviseer een ieder geen zaken te doen met Leapp.nl

-Joep

The post Leapp refurbished iPhone 8 – Binnen maand stuk (Dutch article) appeared first on JPEG Repair | Photo Recovery | File Recovery | Video Recovery.

Nikon RAW NEF and STOP DJVU ransomware

$
0
0

It turns out, RAW Nikon files (NEF) are easier to ‘repair’ even than RAW Canon files.

I will expand this post this week, and add a video, but full resolution JPEGs can be extracted from corrupt NEF files affected by STOP DJVU without the trickery required to repair Canon CR2 files. It appears the full res preview survives the encryption due to not being within the first 150 KB of the file. Full resolution JPEG inside a CR2 file is partially encrypted (header + portion of image data), in NEF it is not affected.

I’ll also be updating JPEG-Repair to accommodate easier selection of the corrupt files (all files with extensions below are ignored and not available for selection).

.STOP, .SUSPENDED, .WAITING, .PAUSA, .CONTACTUS, .DATASTOP, .STOPDATA, .KEYPASS, .WHY, .SAVEfiles, .DATAWAIT, .INFOWAIT,.djvut .pdff, .tro, .tfude, .tfudeq, .tfudet, .rumba, .adobe, .adobee, .blower, .promos, .promoz, .promock, .promoks, .promorad, .promorad2, .kroput, .kroput1, .charck, .pulsar1, .puma, .pumax, .pumas, .shadow, .djvu, .djvuu, .udjvu, .djvuq, .uudjvu, .djvus, .djvur, .klope, .kropun, .charcl, .doples, .luces, .luceq, .chech, .proden, .drume, .tronas, .trosak, .grovas, .grovat, .roland, .refols, .raldug, .etols, .guvara, .moresa, .verasto, .hrosas, .kiratos, .todarius, .hofos, .roldat, .dutan, .sarut, .fedasot, .browec, .norvas, .ferosas, .rectot, .skymap, .mogera, .rezuc, .stone, .redmat, .lanset, .davda, .poret, .pidon, .heroset, .myskle, .boston, .muslat, .gerosan, ,vesad, .horon, .neras, .dalle, .lotep, .nusar, .litar, .truke, .besub, .cezor, .lokas, .godes, .budak, .vusad, .herad, .berosuce, .gehad, .gusau, .madek, .tocue, .darus, .lapoi, .todar, .dodoc, .bopador, .novasof, .ntuseg, .nelasod, .mogranos, .cosakos, .nvetud, .lotej, .kovasoh, prandel, .zatrov, .masok, .ndarod, .access, .format, .brusaf, londec, .krusop, .nasoh, .nacro, .pedro, .mtogas, .coharos, .nuksus, .vesrato, .masodas, .stare, .cetori, .carote, .shariz, .gero, .hese, .geno, .seto, .peta, .moka, .meds, .kvag, .domn, .karl, .nesa, .boot, .kuub, .noos, .reco, .xoza, .bora, .leto, .werd, .nols, .coot, .derp, .nakw, .toec, .mosk, .lokf, .peet, .grod, .kodg, .mbed, .zobm, .rote, .msop, .hets, .righ, .gesd, .merl, .nbes, .mkos, .redl, .piny, .kodc, .nosu, .reha, .topi, .npsg, .btos, .repp, .alka, .bboo, rooe – Source: https://geeksadvice.com/remove-djvu-ransomware-virus/


The post Nikon RAW NEF and STOP DJVU ransomware appeared first on JPEG Repair | Photo Recovery | File Recovery | Video Recovery.

Unstable SD card with bad sectors data recovery – freezing, locks up, read errors, disconnects

$
0
0

Recovering your precious photos from a SD card can be challenging enough after accidental file deletion or formatting. Recovering data from an unstable SD Card may prove to even more difficult.

Recovering data from an unstable SD Card

Many file, photo and data recovery tools available focus on file recovery. Their efforts focus on discovery of file system meta data and/or ‘magic byte sequences’. If enough file system meta data can be discovered you’ll be able to recover your files, complete with names and directory structures. But even if this meta data is largely lost, as long as the actual data exists it can often be recovered by scanning the memory card for magic bytes. The latter is known as RAW recovery or file carving.

Read errors can result in lock ups

However most tools do not fare too well if the card doesn’t play nice and reports read and disk access errors. Some tools may be able to skip bad sectors but if the card locks up or stops responding, sometimes even disconnects, then they’ll probably just give up. If they’re even able to do so, instead of locking up themselves.

File or data recovery software reads raw sectors from a drive. However, once a read command is issued they’re at the mercy of the card. If all works as designed the card returns the data. If the SD Card controller can’t read the data it will return an error instead. The file recovery tool then needs to decide what to do next. Try reading the sector again? Or accept the error and try reading the next sector?

But even before it comes to this, this exchange of data and return codes passes through several layers. The operating system, the USB bus, the card reader etc.. It is not uncommon that something in this chain locks up. The USB bus may even decide to drop the SD Card or reader entirely, often causing the requesting file recovery tool to freeze. Many of us have experienced at some point the Windows file explorer to freeze when trying to read a file with a bad sector.

Handling SD Cards and USB disconnects

Best solution for these unstable SD Cards is imaging them sector-by-sector rather than try reading them file-by-file. This limits the amount of disk access as each sector only has to be tried once. A file recovery tool typically needs to access multiple areas and goes back and forth between file system meta data and actual file data. This may increase wear, increase ‘opportunities’ for the hardware to lock up and slows the process down.

Special hardware

Ideally such unstable SD Cards are sent to a data recovery lab. Such labs have the hardware to stabilize USB connected storage devices. These tools also allow for a more direct communication with the SD Card or USB Flash drive. If needed they can even power cycle a drive. These devices and the accompanying software often cost several thousands of Dollars plus additional annual license fees.

DeepSpar USB Stabilizer

USB Stabilizer may look simple but is quite advanced and costs well over $1000. It includes a hardware component too.

If it comes to that, a data recovery engineer can even decide to bypass the USB flash drive or SD Card controller all together and read the memory chips directly. For that even more expensive hardware and software is required. As without the controller as middle man the raw dump will contain meaningless, and scrambled data, the conversion to a logical image is a time consuming process.

Linux and ddrescue

A possible alternative for end users may be a Linux rescue environment and using ddrescue. Linux often is more stable when dealing with unstable hardware compared to Windows. The tool ddrescue is designed to expect bad sectors.

Possible solution for Windows

To some degree and with some effort, imaging can often be done from Windows too. The trick is using a tool that expects read errors and lock ups. When writing the disk imager module of JpegDigger I used my own experience with unstable USB flash drives and memory cards. These are:

  • Re-reads of bad sectors hardly ever pay off. If reading a certain sector results in the drive dropping the connection, re-reads will simply cause more dropped connections.
  • One read error can result in the rest being read bad too, even when next sectors are in fact good
  • The USB drives or cards frequently drop the connection which is a royal pain in the .. you know ..
  • Once connection dropped, picking up the process at the point where it was left isn’t simple enough in most tools
  • Be prepared to baby sit the process: Once a connection gets dropped, you will need to manually re-insert the card or USB flash drive
JpegDigger handling a dropped memory card while imaging

JpegDigger handling an unstable SD Card while imaging: Remove and re-insert, then click OK to continue …

The built-in disk imaging module in the soon to be released version of JpegDigger tries to detect if the memory card or USB flash drive dropped off-line. It allows you to re-insert the drive and then continue the imaging process. You can also configure it to stop imaging after a certain amount of errors, allowing you to remove and re-insert the drive and then continue.

Ideally you’d use an external reader with a power switch, but I haven’t been able to find one yet.

One major advantage that JpegDigger offers is the entropy map. A successful read does not mean by definition valid data was returned. The card might as well be returning sectors filled with zeros. Using the entropy map such a situation would be easy spotted, the map would be black and stay black. Black means no data or a repeating byte pattern (0xFF, FF, FF etc.). A bright green entropy map is what you would expect when imaging a SD Card containing photo and video data.

Dealing with unstable SD Cards in Windows

So, although the JpegDigger is ideal and certainly not the best, it does often allow you to image an unstable SD Card in Windows.

For completeness sake, I must warn you that any DIY attempts to recover data from any ill behaving drive may make the situation worse. If your data is of value the best advise is to take it to a data recovery lab.


The post Unstable SD card with bad sectors data recovery – freezing, locks up, read errors, disconnects appeared first on JPEG Repair | Photo Recovery | File Recovery | Video Recovery.

Recent changes to JPEG-Repair Toolkit

$
0
0

2.8.101

# Adds MCU clone tool

To repair a JPEG you typically need to remove corrupt data which affects alignment of all data following corruption. To re-align you then insert stuff bytes (zeros) which leave a grey horizontal line. In this video I show how I use MCUs directly above the grey line to replace the stuff bytes.

# File selection dialog ‘show all files added’.

Brings JpegDigger to version 2.6.121

# adds ability to load disk images. Only RAW images supported.

# adds ability to create a RAW disk image. Testing is limited to memory cards and USB flash drives I have at my disposal. I have tried to make it as robust as possible, also when dealing with unstable memory cards and flash drives.

# Manual defrag requires less clicks: add option to auto render, so resulting image is loaded as soon as you select or deselect clusters.

# May feel slower as I was too optimistic in previous build with discarding blocks of data, resulting in the tool missing potentially recoverable data.

2.8.88

# I removed and changed code that might upset virus scanners because that’s becoming a bit of a plague.

Various virus scanners have been flagging my tools as trojan lately, I must stress these are false positives. JPEG-Repair and JpegDigger do what they’re intended for, repair and recover digital images. They do not leave traces on your system, don’t call home or anything of the sorts.

These detections are ‘heuristic’ Some AV vendors refer to it as ‘AI’ that supposedly learns how malware behaves and what it looks like. So the scanner does not actually and factually find a virus, but ‘thinks’ the program might contain some harmful code. Sometimes this is based on for example readable strings in the compiled program. So for example there is code in the program that deals with handling the registration key. Certain variable names may resemble code in ransomware software as both deal with hashing and encryption. And indeed, something simple changing names of such variables to something more neutral, lowers detection rates.

It is kind of ridiculous that I have to put so much time and work into this because they get it wrong.

If your AV software complains about JPEG-Repair or JpegDigger, please submit them to the AV software vendor for analysis.

# Brings JpegDigger to version 2.6.48. I have been bug hunting to try to pin point and solve some perky bugs that show up lately; hang while scanning, hang while copying and error 13 messages. Thing is I can’t reproduce them, which makes them hard to trouble shoot.

2.8.82

# I removed bunch of code related to detection of encoding, encryption etc. of data. There are no functional changes.

Purpose of the drill is to get rid of any code that may trigger false positives from AV security products which are a plague lately. JPEG-Repair and JpegDigger are both clean. I try to be as open as possible, the software does not install, modify registry, phone home or any of that. But lately AV vendors frequently started flagging both tools as possible malware, or trojan or whatever. These are false detections!

# Brings JpegDigger to version 2.6.26 (misc fixes and ads RAF detection)

2.8.75

# Adds cross hair to magnifier.

Requested by users. As the image magnifier shows goes through various conversions the cross hair may be off under conditions, so I also added the option to calibrate: double click magnifier to launch calibration window.

# Brings JpegDigger to version 2.6.14

Various features added, deepscan, CR3 RAW file detection and a virtual cluster viewer/editor which allows for manual file defrag during recovery.

2.8.70

# Adds truncate option to accommodate repair of STOP/Djvu family ransomware affected RAW photos

RAW files are typically 20 MB or larger. JPEG-Repair ignores FF D9 marker then ‘append’ header feature is used which implies it will treat the full size of the RAW as JPEG data. Program will feel slow because all this data is processed. New truncate feature will cut file at point up to where pseudo decoder came which is normally the end of JPEG data.

# ZIP includes latest JpegDigger (2.5.93)

2.8.68

# Fixes loop where cancel button didn’t do anything

JPEG-Repair can encounter a situation where it keeps reloading the damaged file in patch mode, it was not possible to cancel out of that.

2.8.66:

# Due to an influx in STOP Djvu related cases this version adds an extra option to the append feature:

Append takes the header of a reference file and ‘glues’ it to the corrupt file. The new option allows you to select a number of bytes from bitstream of reference file to be inserted before data from corrupt file (this was a fixed number, 4096 bytes). This allows for greater flexibility for getting for playing with color and brightness. It also helps if reference file is visually similar to the corrupt file.

2.8.61:

# Mostly usability, as I am probably the one who uses JPEG-Repair the most I removed some stuff that I actually never used.

# Magnifier, I want it to be able to watch it next to mouse pointer: Left click to make it so. Release and it will snap back in it’s original position.

# I also do a lot of saving and file loading for example because JPEG-Repair removes invalid markers and such so I made it batch this. When opening a corrupt file it may now automatically save and open files a few times.

# I also added save/reload option, saves current state and reloads the saved file. In effect creates an undo option.

# Enable align option removed. Current mechanism is, if value for bytes to add > 0 then it’s enabled.

# Bytes removed value no longer copied to bytes to align value. If you wish to copy the value however, simply double click bytes to add value.

# Double click byte address to jump to first byte in scan data.

# As modifying resolution is in fact patching I moved it to the editor area.

# Some modifications to append option based on experiences repairing ransomware encrypted JPEG’s.

# Bug fixes.

Version 2.8.24

# Adds decoder support for restart markers

Decoding may fail however with severely corrupted JPEGs in which case editor is disabled.

# Removed automatic byte address autofill as result of a decoder error

Decoder may fail only after some time corrupt data was introduced in stream. JPEG-Repair automatically selecting fail byte address results in user removing corrupt data from the point while corrupt data that preceeds that point remains. So user now has to click image to select point from which corrupt data is to be removed. I feel it’s more consistent and more correct. My strategy is always to click slightly before visual corruption to make sure all corrupt data is actually removed.

# Decoder speed improved (2 – 2.5 times faster)

Did some optimizations in pseudo decoder. I was still decoding data I never actually used.

# Fixed issue with magnifier and portrait mode images

Lower part of portrait oriented images could not be selected by clicking the image. Took me a while to figure out, but is fixed now.

# Default for ‘show preview’ in browser for corrupt files is now Disabled.

I got too man reports where JPEG-Repair would hang when selecting corrupt files. Reason for this was the image viewing component I use would hang trying to decode the corrupt file.

# Name change: Was JPEG-Repair Toolkit, is now JPEG-Repair

In the future I will refer to JPEG-repair AND JpegDigger as JPEG-Repair Toolkit. Stand alone tool will be referred to as JPEG-Repair. I will at some point offer the JPEG-Repair Toolkit which includes JPEG-Repair and JpegDigger, and JPEG-Repair and JpegDigger as stand alone tools.

# Provisions to accommodate future license models

See previous point.

# Download now includes JpegDigger


Changes to JPEG- Repair from version 2 >

I feel quite confident in saying, that IF a file is repairable (so, contains JPEG data + we have reference header), JPEG-Repair Toolkit can help you do it. So if you need to fix corrupted photos, you may want to give it a try.

2.5.91: Most work went into GUI, program flow. Goal was to make JPEG-Repair more user friendly. Several components moved to places to where they’re needed rather than just sitting in the main screen. Magnifier now has a fixed position (no longer needed to click the mouse).


2.5.23: fixed typos, reference file dialog parses EXIF info from donor file, added no preview option to open file dialogs to prevent lockups with severely corrupted files.

JPEG-Repair now parses EXIF data from reference files.

JPEG-Repair now parses EXIF data from reference files.

Pre 2.5.23>>

  • MCU aware pseudo JPEG decoder with (decoding) error detection
  • Improved navigation through image using image view (up/down line of MCUs, up/down MCU)
  • JPEG preview in file browser
  • Resolution override settings (to fix corruption like this)
  • Patch now sort of guides you through first repairs, repair invalid markers and prompt to load repaired file
  • No longer needed to copy to folder with corrupt files and rename reference file to sample.jpg. You will be prompted to select a reference file.
  • Append option: Appends selected JPEG header to any file, so cool!
  • Error report window, fired if repair fails or encountered errors
  • RGB info added to magnifier which I find to be useful for images where it is difficult to visually match colors in different areas.
  • Changed nagging dialog in trial, less pop-ups, trial must be usable to some degree
  • Changed trial limitations in PATCH mode: Now possible to go through several iterations of file repair.

Append option is particularly powerful! Check video for an example, none of the competing tools (Stellar, HetMan, PixRecovery, Picture Doctor, JPEG Recovery Pro) is able to repair images like these. Apart from example in video several others (more interesting pictures) were fixed using this method.

These are the different stages:

  1. Basically the file is binary blob with no recognizable JPEG structures. However entropy suggests JPEG data. JPEG Header is glued to file.
  2. After JPEG header is glued to file and data was stripped from byte combinations that upset photo viewers (JPEG decoders).
  3. About 1/6th of total data in file was cut to get us at stage 3. Just tiny amount of corruption + overriding header width/height settings + cropping end of file gets us:
  4. Almost final file. Image is copied to Windows clipboard and further cropped and color corrected using PhotoDemon.

Thanks to append option we can virtually repair any JPEG, as long as it contains JPEG data and we have a suitable donor/reference file.

Various improvements and bug-fixes in PhotoHeal companion app.

  • Filename is automatically generated for images pasted from clipboard
  • Added preview in file/open save dialog
  • Fixed bug with scrollbars

The post Recent changes to JPEG-Repair Toolkit appeared first on JPEG Repair | Photo Recovery | File Recovery | Video Recovery.


Recover deleted DCIM folder on android mobile phone (Samsung)

$
0
0

Original question: Help, I deleted my entire DCIM folder from mobile phone (Samsung) Micro SD Card. Can I recover my photos? A typical answer to this question in many forums and communities is, pull the SD Card from the phone and run PhotoRec. This is indeed an option, but I’m not sure if it’s the best one and I’ll explain why.

Recover a deleted DCIM folder on Android mobile phone

Let’s first look at PhotoRec.

PhotoRec main disadvantages

  • PhotoRec will not detect device encryption. SD Cards may be encrypted in Android devices such as smart phones. As PhotoRec is a RAW scanner, scanning for magic bytes of for example JPEG photos, it will not find any due to possible encryption. The user may come under the assumption that he can not recover the data.
  • Scans original card, may worsen potential physical issues.
  • Produces many false positives (corrupt photos).
  • Some may find it hard to use as it is a command line tool. Note that it comes with a GUI front end too, but not all options are available in that.

JpegDigger offers some answers to some of those issues.

How JpegDigger can help recover photos from an Android phone micro SD

  • First of all I suggest creating an image file. It provides you with a safety net should anything happen to the SD Card before you have the chance to recover your data. Secondly, JpegDigger’s entropy map will reveal if we’re dealing with encryption. If so, complete the image file, then move the card back to the phone and decrypt it. Remove from phone, insert in card reader and image it again. Note that I am assuming ‘full disk encryption’, this will be true in most cases.
  • JpegDigger can now scan the decrypted disk image and recover photos from it. Unlike PhotoRec, JpegDigger’s false positive rate is very low! Any photo it shows a preview for can be recovered.

How JpegDigger can help detect encryption

JpegDigger calculates the entropy for the data in each block you scan or image. It expresses this is a value from 0 – 8 bits/byte, zero being lowest entropy, 8 highest. You could regard entropy as a measure of chaos or predictability. A property of compressed data is that it has high entropy. JPEG photos are compressed, most image formats are. For blocks containing compressed data, the entropy bar in JpegDigger will become bright green. Highest entropy we find in encrypted data. Block of encrypted data will color the entropy bar cyan.

JpegDigger imaging an SD Card

JpegDigger imaging an SD Card – The horizontal entropy bar is bright green for the part of the drive already imaged.

If the entropy bar colors cyan then you’re imaging a card with encryption. I suggest you continue and create the disk image. Then insert the card back into the phone and decrypt it. This may take a while, once done connect the card to a card reader again. For the sake of safety, image it again.

Creating a disk image using JpegDigger

  1. Select the card’s drive letter.
  2. Click override > Manual > Set start sector to 0, block size to 32 or 64. Click OK.
  3. Now click disk image button .
  4. The create disk image module will become visible, click the button labeled ‘Start’.
  5. Select file name and destination folder.

Recovering your photos from deleted DCIM folder

The process for processing an actual drive or disk image is largely similar.

  1. Select the source, either the drive or click the button ‘Open disk image’. In case of the latter you will be asked to select a disk image.
  2. In case you select a disk image the Override window will pop up. Click ‘Help me determine values’, once that finishes click OK at the bottom of the window.
  3. Now click ‘Scan’.
  4. Review, select and save photos.

Dealing with Micro SD Card encryption in Android phones

Good news is, that as far as I can find, encryption on SD cards is disabled if the card is used as external or portable storage. If enabled then it’s good to know Android encryption comes in two flavors:

  • File based: each file is separately encrypted.
  • Full disk based. As far as I can determine this is far more common.

If during the imaging you determine it is likely the data on the SD Card was encrypted, it’s best to finish the image > Move the card back into the phone and decrypt it. All blocks, even those containing the deleted data will be decrypted.

However this method will not work if the files are separately encrypted, the phone will not decrypt deleted files. I am currently researching if recovering the deleted encrypted files will work. Then move those back to the memory card and insert it back into the phone.

Note that the above does not imply that you can recover photos from a factory reset phone! The reset deleted the key needed to decrypt data!

Disclaimers

First of all I’d like to mention that I am not an Android expert. I have researched this as good as I can and tested some scenarios with Android phones I have at my disposal.

Information may be Android version dependent and may not apply to older or newer Android versions (I used Android 9 devices). In general a rule of thumb is, the older the Android version, the easier it is to recover data.

It appears on newer devices encryption is the default if the device manufacturer follows Google guidelines. So a guideline may state it’s mandatory that for version x of Android that encryption is on. However, if you initially purchased your device with an older version and simply updated to the latest Android, this may again not be true (so encryption is off).

Another factor that may already be applicable and that we may see more of in the future is that deleting data may actually mean deleting data due to the SD Card equivalent of TRIM. TRIM is a mechanism found in SSD drives that helps drives maintain high performance by pro-actively erasing data. The SD Card moniker for this is the ERASE command.


The post Recover deleted DCIM folder on android mobile phone (Samsung) appeared first on JPEG Repair | Photo Recovery | File Recovery | Video Recovery.

Media-Repair. Small repair tool for MP3 and WAV files affected by STOP/DJVU

$
0
0

I am working on a small repair tool that allows you to repair MP3 and WAV files that are affected by STOP/DJVU ransomware. To test it I need files encrypted by this ransomware. To repair WAV files the tool requires a reference file: A file recorded with the same device or same software as the victim files.

media repair tool for MP3 and WAV audio files

So, if you have any of those and would like me to repair them, please share them with me. I’ll then try to adjust the tool to repair them and send it to you so you can repair the rest of the files.

Drop me an email and the URL where you’ve uploaded them (Google Drive or similar).


The post Media-Repair. Small repair tool for MP3 and WAV files affected by STOP/DJVU appeared first on JPEG Repair | Photo Recovery | File Recovery | Video Recovery.

Accidentally deleted pictures from SSD. Recovered but they’re corrupted.

$
0
0

Case study, Story goes like:

Accidentally deleted some pictures. Recovered them but they’re corrupted. Anyway to fix it?
“I used Recuva to recover a good chunk of my pictures that were deleted but it seems that even though the file was recovered I can’t view its contents? Any program that helps with this? They were on an SSD if that helps.”

There’s ONE major contributing factor in this case. Can you spot it? I can tell you it is not about Recuva. Any other file recovery software, even the most expensive, would have run into this exact same problem. The major contributing factor is the fact that the files were deleted from an SSD.

File recovery scammers that promise SSD undelete

Almost every manufacturer has a or often multiple ‘honey-pot pages’ on which they try to score on search phrases like SSD and undelete or recover. They’ll vaguely suggest their software can help. 9 out of 10 times this is not the case. In the remaining case, any other decent file recovery software would have been able to help to. It all comes down to end user file recovery and undelete software not being able to do anything special when it comes to recovering data from an SSD. They’re trying to sell to you, and they sell BS. WonderShare (RecoverIt), Nucleus Technologies, Stellar and CleverFiles (DiskDrill) are some examples of that. Problem is that Google Search can’t detect the level of BS so these pages score good.

Back to the case

Anyway, since Recuva is free, it’s always worth a try. When you do however try, make sure to install/run Recuva from a different drive and to save the files you’re recovering to a different drive too.

Now back to our case. My hypothesis is the files contain only zeros. I ask him to send me some of the recovered photos. I use my JPEG-Repair software to diagnose the files. I want to determine the entropy of the data inside the file. Easiest way to do this is:

  1. Run JPEG-Repair
  2. Select Extract tool
  3. Select the file(s)
  4. Set minimum resolution to 0 MP (zero)
  5. OK and then click repair.

I then get the error log:

Deleted file recovered from SSD using Recuva contains no data

We can now tell the entropy for the file is 0.00 bits/byte. This means the file is filled with one byte value repeating over and over, so no actual meaningful data. Since this file was deleted from an SSD, this byte value is zero (most likely).

So even though Recuva and other file recovery software appear to be successful in recovering deleted data from an SSD, these files are useless in 99% of the cases.

What happens when you delete a file from a SSD?

This can be explained by the operating system, when you delete data will send a TRIM command to the SSD. By means of the TRIM command it let’s the drive know that the sectors associated with the deleted file aren’t needed anymore. Due to the way an SSD works, it has a constant need for free ‘space’ that it can erase so it’s ready for new data, but I won’t be going into that now.

In 9 out of 10 cases (not exact number, but to make the point) the drive will immediately remove these sectors from let’s call it ‘user addressable space’. If the contents of the sectors are requested (in our case by Recuva) the drive returns zeros. This is called ‘Deterministic Read Zero after TRIM’ (RZAT).

As you may know, in many cases the file system entry may be available after file deletion for a while. And this information can then be detected by Recuva. With that file system entry Recuva has everything it needs to determine the actual disk space that was assigned to the file before the deletion. Only trouble is, that when it copies that data to a new file, it’s only reading zeros.

For a moment yo may feel relieved seeing your files are recovered. However you’ll soon find that they’re ‘corrupt’ at least that’s what photo viewers and editors may suggest. Reality is that they do not contain ANY meaningful data and are therefor beyond repair.

Data recovery from an SSD impossible?

The answer to that would be NO. So we see key is, IF a TRIM command is send to the SSD. In many cases it may not or it may not reach the drive. You could say a TRIM command is send when the deletion is intentional. So when you delete a file or format a drive, the OS will send a TRIM command. If files are lost due to some kind of file system corruption, then no TRIM command is issued.

Also, the interface you used to connect a drive to the PC may be incapable of relaying these TRIM commands so the command never reaches the drive.

Some drives may NOT use the RZAT or Deterministic TRIM (DRAT) mechanism (rare IMO but non the less) and may return actual data as long as it hasn’t been actually erased.

There are more reasons that may prevent data from being TRIMMED.

So, TRIMMED data can not be recovered?

This is not entirely true either. Actual erasure of TRIMMED blocks may take some time, and it’s typically something a SSD does when being idle. So generalizing, the data will be erased when the SSD is powered on an idle. This means the data is still somewhere on the drive even we can’t get to it.

As long as that’s the case a data recovery of forensic lab may still be able to recover the data using special hardware. This hardware is normally not within reach of end users like you and me unless you have say $10000 to spare and are willing to invest loads of time in learning to work with these tools.

So my best advise is, that IF you deleted vital files from an SSD, is to pull the power and contact a reputable data recovery lab.


The post Accidentally deleted pictures from SSD. Recovered but they’re corrupted. appeared first on JPEG Repair | Photo Recovery | File Recovery | Video Recovery.

These 9 Sony memory cards might corrupt your files

$
0
0

Sony has issued a product advisory warning for nine of its SD memory cards, across three different product lines, that might damage your data.

Notice of Replacement program for affected SF-M series, SF-M series TOUGH specification, and SF-G series TOUGH specification SD memory cards

The cards, listed below, are at risk of corrupting your files when recording video, according to Sony:

SF-M Series
SF-M64
SF-M128
SF-M256
(Applicable cards can be identified by the presence of V60, R:277MB/s, and W:150MB/s on the card frontside.)

SF-M Series Tough Specification
SF-M64T
SF-M128T
SF-M256T

SF-G Series Tough Specification
SF-G32T
SF-G64T
SF-G128T

Sony US is offering to replacement any affected memory cards (subject to limited warranty) free of charge for the next 21 months, from 11 June 2020 to 31 March 2022.

https://www.sony.com.my/electronics/support/articles/00246229

Regarding SD memory cards of SF-M series, SF-M series TOUGH specification, and SF-G series TOUGH specification, recorded data on the card may be damaged or data may not be recorded correctly when shooting video on a camera* in video speed class mode.
* The camera compatible with video speed class V60/V90 etc. as recommended recording media.

We are offering free replacements for affected SD memory cards from June 11, 2020, through Mar. 31, 2022, subject to the limited warranty that accompanied the SD memory card. Please see below to determine if you have an affected SD memory card and call us at 239-768-7669 to arrange for your card replacement.

IMPORTANT PLEASE NOTE AND FOLLOW THESE INSTRUCTIONS:

We apologize for any inconvenience this may cause and thank you for your understanding and cooperation.

As a result of the ongoing COVID-19 situation, some of our services may be impacted. We will try to minimize this, but delays may occur. We seek your kind understanding during this challenging period.

How to check if your Memory Card is Affected

Applicable cards can be identified by the presence of V60R:277MB/s, and W:150MB/s on the card frontside. To check whether your card is affected, look for a star mark on the lower left corner on the back of the card. If your card has NO star mark, your card is affected by this issue.

To check whether your card is affected, look for a star mark on the lower left corner on the back of the card. If your card has NO star mark, your card is affected by this issue.

To check whether your card is affected, look for a star mark and an alphanumeric on the lower corner on the back of the card.

If your card has NO star mark and has an alphanumeric beginning with TV, your card is affected by this issue. (If your card has an alphanumeric beginning with TR, your card is not affected by this issue.)

The post These 9 Sony memory cards might corrupt your files appeared first on JPEG Repair | Photo Recovery | File Recovery | Video Recovery.

Repair MP4, MOV, 3GP, M4V, WAV, MP3 after STOP/DJVU ransomware

$
0
0

As most ransomware STOP/DJVU encrypts files to make them inaccessible. After you pay the ransom (in bitcoins), the attackers send the tools and information needed to decrypt your files and make them accessible again. The encryption is very hard to ‘break’ but ransomware researcher every now and then have success creating decryption software. Some time decryption keys ‘leak’ or the malware researchers are able to find weak spots in the ransomware which they can exploit.

Encrypting files takes time. The larger a file is, the more time is needed to encrypt it. However to be able to spread more rapidly, STOP/DJVU opts to encrypt only a portion of each file. Partial encryption allows the ransomware to attack your system faster.

My files are encrypted by ransomware, now what?

This page will not help you get rid of ransomware, the focus is getting data back or making data accessible. To find out how to get rid of ransomware, the various AV software vendors offer explanations and tool that for that.

To try and recover data it’s not necessary or even desirable to change anything on on the drive the encrypted data is on. Ideally you attach the drive to a clean system, and refrain from running/executing anything from the patient drive. 

Ideally you treat this as a data recovery type scenario. This implies you first create a sector by sector copy or disk image of the patient drive.

With regards to recovery: Concentrate on user files and data: Your documents, photos and videos etc.. The operating system and software can be reinstalled so there’s no use in decrypting or trying to recover those.

Ideally a decryptor is available

To find out which ransomware you’re dealing with, and IF a decryptor is available I suggest using this website: https://id-ransomware.malwarehunterteam.com/. Upload a sample and the website will try to determine the precise ransomware and if a a decryptor is available it will point you to it. IMO, the decryptors pointed to by this website are the only ones you should trust!

Do NOT trust any decryption software or services as for example offered in FaceBook ransomware support groups or in other forums. All the ones I checked out were scams!

Scammers, claim to be able to decrypt files

Typical shills for scammers that claim they can help decrypt ransomware files. In fact when I contacted the scammer, most of the people advertising him, was the scammer himself, using exact same scripted answers.

No decryptor, what are my options?

  1. Wait. First thing you can do is keep the drive containing the encrypted data in a safe place and wait for a decryptor to become available. There is however no guarantee this will ever happen.
  2. Shadow copies. Note than most ‘modern’ ransomware will erase those but it’s still worth a try. Use for example: https://www.nirsoft.net/utils/shadow_copy_view.html. Note about the Nirsoft website: Tools on this website may trigger your AV software. I’m 100% certain these are false positives. Read https://www.nirsoft.net/false_positive_report.html for more more info. The same happens to my own tools frequently too.
  3. File Recovery. Ransomware frequently operates like this: Open original file and read contents > encrypt data > save encrypted data to new file > delete original file. So this means the deleted file is potentially recoverable. Examples of file recovery tools used by professional data recovery technicians are ReclaiMe, R-Studio, UFS Explorer and DMDE. ReclaiMe is probably easiest to use, DMDE the most affordable one.
  4. File Repair. As STOP/DJVU variants in particular only encrypt part of the file, some file types allow for repair partial repair. I have for example used this: https://codecpack.co/download/Digital_Video_Repair.html to successfully repair video files encrypted by STOP/DJVU variants. My own software JPEG Repair can repair JPEGs, extract JPEGs from RAW files, some example repairs here: https://www.youtube.com/playlist?list=PLSL85pYTZnmvSGGzl-FujiVaV2-aohEoI. I am working on a utility that can repair various file types myself.
Chances for file recovery from ransomware

Small scale research on recoverability of original, non-encrypted, deleted files (method 3). Method 1 = decryption, method 2 = shadow copies

The post Repair MP4, MOV, 3GP, M4V, WAV, MP3 after STOP/DJVU ransomware appeared first on JPEG Repair | Photo Recovery | File Recovery | Video Recovery.

An alternative for repairing STOP Djvu encrypted photos

$
0
0

Over the past few months I did a number of videos that show how you can use JPEG-Repair (the repair part of the JPEG-Repair Toolkit) to repair STOP Djvu encrypted photos. During the making of the videos and also while investigating photos for customers I found that most photos can be repaired. This includes JPEG type photos but also various RAW photo format such as Canon RAW (CR2), Nikon RAW (NEF), Sony RAW (ARW – Only embeds smaller JPEG previews!) etc..

Repairing STOP Ransomware encrypted photos often is a lot of work

While grabbing full resolution JPEGs fro Nikon RAW (NEF) is relatively easy and straight forward, repairing the JPEG inside a CR2 involves quite a bit of work as the JPEG itself is partially encrypted too. If the photo is a JPEG then part of the file is encrypted by definition and this also means more work and implies the requirement of a reference file.

So while repair using JPEG-Repair is possible and a relatively low cost solution, it requires a lot of time and effort (just watch some of the videos to see what I mean). This week I was helping a data recovery lab repair CR2 files affected by the STOP ransomware. An engineer repairing individual photos, file by file, while spending several minutes on each file becomes a costly endeavor.

For an end user it may be plausible to invest more time than money. From a data recovery lab’s point of view time is money. Each minute and engineer spends on repairing photos will be charged. Repair of a few dozen photos may become more costly than recovering hundreds of photos from a corrupt memory card.

The alternative: jpeg-repair.org

To help find my customer find a more economical viable solution I fed some of his STOP Djvu affected files + matching reference file to the online web based automatic repair service jpeg-repair.org. You can trial the service for free, however repaired photos are heavily watermarked.

jpeg-repair.org, web based, automated photo repair service

The process is easy enough: drag and drop the damaged photo to the appropriate box, and also do so with the reference file. Just like with JPEG-repair you need a reference file shot with the same camera and settings (specially resolution is important).

For testing purposes I fed it RAW files for ‘to be repaired files’ and a JPEG as reference (that I extracted from intact RAW file), but I also tried feeding an intact RAW file as reference. In both cases I got decent results! So the tool is intelligent enough to find the embedded JPEG within the intact RAW file and use it as a reference. Because, just like with JPEG-Repair (my tool), the end product is a JPEG file! The online service can not actually repair RAW photos.

Prices range from 19.99 – 99.95 (Euros). For 19.99 you can repair 10 photos. To repair upto 250 photos you pay 49.99 and to repair up to 1000 photos you pay 99.99. More pricing is available for those who want to ‘resell’.

So for my data recovery lab friend, jpeg-repair.org may actually be a good option. For a reasonable price he can offer to repair upto 1000 photos for his client without having to dedicate and engineer for days worth of time to the job.

You as a home user may even consider you rather spend time than money, in which case JPEG-Repair is the best option if you need to repair more than, say 10 files.

Create a disk image of a SD Card or small USB flash drive

$
0
0

In this post I’ll explain how you can create a sector-by-sector disk image of a small USB flash drive or memory card using JpegDigger. This type if disk images are also referred to as dd or RAW image files. The disk image is an exact copy of each sector of the drive that was imaged.

Reasons and advantages of a disk image:

  • Provides you with a safety net.
  • Processing a disk image with file recover software is often faster than processing original media.
  • It has diagnostic value (detection of bad sectors).
  • In case of bad sectors, bad sector handling is isolated from file recovery process.
  • Disk image can be shared with and processed by a 3rd party.

Specially in case of read errors a disk image is recommended. File recovery software typically reads areas multiple times, jumping back and forth between file system meta data and file data. It potentially ‘hits’ bad sectors multiple times, each time resulting in slow downs and potential freezes of the file recovery software.

During the image process each sector is typically read one time. Depending on imaging strategy bad sector can be tried multiple times or skipped altogether. By dealing with bad sectors at this stage, we isolate this problem from the actual file recovery phase.

Special considerations when imaging SD and other memory cards or small USB flash drives

USB flash drives and often memory cards too are accessed over USB. USB does not handle drives with bad sectors particularly well. It’s not uncommon for the USB device to be dropped if it does not respond quick enough. In many cases this means you have to deal with the dropped device and restart the imaging task.

USB dropped SD Card while imaging

JpegDigger’s imaging module was designed with this problem in mind. If the device you’re imaging is dropped it will prompt you to disconnect and reconnect the drive. In case of a USB thumb drive for example, you remove and re-insert the drive. In case of a USB memory cards reader, you remove and re-insert the reader from and into the USB port.

Once you have done that you click OK and JpegDigger will continue imaging.

Note: If you’re frequently dealing with cases like these consider purchasing 3rd party hardware that allows JpegDigger to handle this task automatically and hands-free.

ykush USB power controller allows JpegDigger to power cycle unstable memory cards and USB flash drives.

Ykush USB power controller allows JpegDigger to power cycle unstable memory cards and USB flash drives.

Creating a Flash Drive Disk Image using JpegDigger

Select the drive you will be imaging from the drop down list. Depending on the state of the file system JpegDigger may open the Override Window. If it does not click Override. Click the button next to ‘Open disk image’ to open disk imaging module.

Check ‘Manual’, set start sector to 0 (zero).

Now we need to decide on a block size. There’s several consideration to be taken into account when selecting the block size:

  • In general a larger block size results in faster imaging speeds.
  • One block size is entirely ‘dropped’ when a read error is encountered. This means, if we encounter ONE read error while blocksize 16 is chosen, 16 x 512 bytes will not be read and therefor not included in the disk image. Instead JpegDigger will insert a zero-padded(*) 16 x 512 byte block. So, to recover as much data as possible from bad spots the smallest possible block size is preferred. In case of many read errors though, this will slow down the imaging process tremendously.

(*) – JpegDigger uses zero-padding to fill dropped blocks. Many tools will also include a string or pattern that makes finding files affected by bad sectors easier. However, since JpegDigger is a photo recovery tool, I took into consideration that zeros have a far less disturbing influence on recovered photos than other options.

Click Start. You’ll be asked to select a location and image file name, for example ‘mysdcard.img’. JpegDigger does not assign an extension! To be compatible with other file recovery software I suggest to use .img or .dd extensions.

Once the disk image is done it can be analyzed by JpegDigger or any other file recovery software.

The post Create a disk image of a SD Card or small USB flash drive appeared first on Home of JPEG-Repair Toolkit | Photo Repair Service | File Recovery.


How can a data recovery lab get the data you can’t?

$
0
0

I am all for DIY (do it yourself). In fact my first website was called ‘DIY Data Recovery’, and the idea was to provide people with information and tools to perform their own data recoveries.  I learned a few things from that. Some things are not suited for DIY’ing. And some things that are DIY-able, labs are much better at. They can do things faster and safer. It comes down to more knowledge and experience, better software and magic “data recovery machines”.

Data recovery techs don’t skip this vital step ..

The first thing a recovery lab will try to accomplish is cloning the patient drive. Whether it is healthy or not. If it’s not healthy, the sole goal of repair is making the drive run stable enough for it to be cloned. A good lab will always clone the patient drive as soon as they have the chance. ALWAYS.

Many end users skip this step. Or they will do it because some with some knowledge on the subject urged them too. And if they clone, they keep going even if all signals tell them, stop this please! A lab has specialized hardware to clone ill drives. This allows them to monitor and adjust the process, more about that later.

Logical Data Recovery

Although good tools go a long way, in the end it’s experience that accounts for a lot. When I was running DIYDataRecovery, people who purchased my software needed a lot of hand holding. That’s not a bad thing, in fact I like supporting people. In fact I like it so much that I regularly offer advice on Reddit and Quora. Often they use the wrong tools for a specific scenario.

Point is, a data recovery lab has a lot of tools where it’s engineers can pick from. From experience a veteran engineer can tell in an X situation tool Y performs best. Or even if he doesn’t have a clue, he can try different tools, pick the one giving the best result or even combine results from different tools.

Professional logical data or file recovery software often allows for greater control than end user software. End user software typically allows the user to select a drive, scan it and then to select and recover files. If the files that are recovered turn out to be corrupt there’s little he can do. Professional grade tools allow the technician to tweak settings and modify file system parameters.

Professional tools offer support for RAID and a great variety of files systems. Some times a combination of both these are required for, for example reconstructing RAID arrays from NAS devices. Some professional tools offer extended integration with data recovery hardware.

Developers of such software benefit greatly from the experiences of data recovery techs. They are provided with feedback based on many real world cases. In return the tech gets even more powerful tools.

Of course, logical data recovery is never done using the original patient but always on a clone or sector-by-sector disk image.

ReclaiMe Pro and USB Stabilizer, a powerful combo

DeepSparUSB Stabilizer can give professional software a boost, allowing greater control over unstable USB connected drives, including SD Card, USB thumb drives, native USB hard drives and also SSD drives

Very sick drives and “data recovery machines”

I already mentioned a data recovery lab tech will use specialized equipment to clone drives (or other storage media). This ‘equipment’ is often a combination of hardware and software. The patient drive is attached to the device (people some times call it “data recovery machines”). The interaction between the device and the drive can be monitored and adjusted using control software. The device sits in between the operating system and the drive. It can tell the OS not to touch the drive.

Some times data recovery machines come as sexy little units ..

Some times data recovery machines come as sexy little units ..

Certain drives for example have known firmware problems that can be ‘patched’. Also the tech can for example decide he does not want a drive to perform sector reallocation on a drive he has just repaired. And commonly read access parameters can be monitored and modified (what action should be preformed on a bad read or when drive becomes unresponsive, etc.). Often the software also controls the imaging or cloning process directly. It is also possible it sits in between the disk imaging software and the patient drive.

Without this software disk cloning could easily take over a month for some drives, if they even make it that far. Unstable drives get sicker and sicker to eventually completely fail. By reducing cloning times drastically the chance of the drive surviving increases dramatically.

Although these data recovery machines can do a lot and certainly a lot more than software alone they can not perform magic. A drive has to be able to spin (assuming a spinning disk for now) without causing damage. So physically damaged disks first needs to be repaired.

Often these data recovery machines are cards very much like a graphics card built into a PC

But often these data recovery machines are cards very much like a graphics card built into a PC

Physical damage needs to be addressed first

Trying to fix hardware related issues about equals killing your disk. Not all data loss issues are DIY-able. I already knew that of course. Drop a mechanical drive and it will most likely result in physical damage. No software tools can help you with that.

Simpler repairs can be done with a closed disk, think electronic components on the PCB that failed. Common wisdom has it you can simply swap the PCB for one from a working identical drive, however this is often not the case. A ‘simple’ board swap requires the drive to be connected to specialized hardware and software to change certain parameters and sometimes to disable bad sector reallocation and such.

For many repairs, you have to open up the patient, some times a drive is opened purely for inspection: Is it safe to power it up or not?

Sure, I know the videos on Youtube of people opening their drives, ‘unstuck’ them and then successfully copy the data. It’s a risky procedure as a spec of dust can already cause havoc. Some even run the drive while being opened and this for certain is a recipe for disaster. A mechanical drive should only be opened in a clean room and never run with the lid off. Even if there is anecdotal evidence of successful repairs outside a clean room.

Patient and donor drive side by side for a 'head-swap'.

Patient and donor drive side by side for a ‘head-swap’.

And while opening the drive and give the heads a little push to unstuck them seems easy enough, more complex repairs require lots of experience and precision instruments. These complex repairs some times have to be repeated multiple times because somewhere between the start of the disk cloning process and the end, the drive simply gives up again. Typically such drives have to be constantly monitored much like a critical patient in a hospital.

Once the drive is repaired it goes back to the ‘data recovery machine’ we looked at earlier and it’s special software can then be used to configure the drive’s firmware and cloning.

Physical repair of flash based drives

Another type of repair is flash based media. Unlike mechanical drives this type of repair does not require a clean room. Simple failed electronic failures on PCB can often be repaired. If this however beyond repair or if the controller failed NAND memory has to be removed from the PCB and dumped using a specialized reader. In case of monolith flash memory, where the controller and actual NAND memory is integrated a layer is scraped off until the naked chip becomes accessible. Tiny wires are then soldered onto pins and a reader to allow dumping of raw NAND memory.

Before such a raw dump can be used to recover data, specialized software is needed to transform the raw data into a logical image that can be processed using file recovery software I discussed earlier.

monolith nand chip soldered to board, attached to power controller, attached to specialized reader controlled by software

Monolith NAND chip soldered to board, attached to power controller, attached to specialized reader controlled by software

A data recovery tech is often one in a network of peers

Two know more than one. And ten now more than two. Data recovery labs often work together to a degree. These are often informal contacts in various online forums and social media. Storage technology is changing all the time, and no one can keep up with everything. Fortunately many techs value sharing of information and knowledge. And because of this, participating labs can solve more cases.

Peers of the typical home user trying to recover his data are often people populating end user forums. Without wanting to sound disrespectful it’s often very much like the one eyed leading the blind. A lot of bad advice is given in these places. Often the goal is to find the cheapest possible solution rather than the best.

Data recovery machines

I have mentioned ‘magic’ data recovery machines a couple of times. You could argue, if I buy me one of those I can do my own data recoveries. To a degree this is true. But first you need to consider the pricing. The tools are expensive to purchase and often there is an annual license attached.

Now that you have purchased the tool you need to learn how to use it. I think I am not exaggerating if I say that to really get to know a tool, takes years. You can somewhat speed that up if you’re willing to book courses, often several thousands of Dollars. There is no magic involved. Most data recovery machines require a solid foundation of knowledge and lots of experience and tinkering.

DeepSpar: Makes a variety of hardware/software data recovery solutions http://www.deepspar.com/

AceLab: The big guns, hardware software combos for HDD, SDD and other flash based drives https://www.acelaboratory.com/

Rusolut: Specialized hardware/software for flash drives https://rusolut.com/

SoftCenter: Specialized hardware/software for flash drives http://flash-extractor.com/

Dolphin Data Labs: Hardware/software for mainly hard drives https://www.dolphindatalab.com/


The post How can a data recovery lab get the data you can’t? appeared first on Home of JPEG-Repair Toolkit | Photo Repair Service | File Recovery.

STELLAR REPAIR FOR PHOTO – Thumbnail extraction feature

$
0
0

A question I get every now then is: Your JPEG-Repair wasn’t able to fix my photos, however Stellar’s Repair for Photo  (click to download) managed to at least extract JPEG thumbnails. (Stellar Repair for Photo was previously marketed as Stellar JPEG Repair.)

JPEG-Repair actually can extract embedded thumbnails for you, and in fact it’s often even better at it than Stellar’s product. But it is a separate tool in contrast to Stellar Repair for Photo where it’s implemented as a backup repair feature in case repair fails.

Thumbnail extraction in Stellar Repair for Photo

The thumbnail is not a function you have to or even can activate. It’s integrated in the process as one of the mechanisms for repair. If your attempting to repair RAW photos (CR2, NEF etc.) rather than JPEG it is the only repair mechanism.

Problem is that Stellar Repair for Photo often only extracts a tiny thumbnail even if a large embedded JPEG is available.

Stellar Repair for Photo extracts a tiny JPEG

Stellar Repair for Photo extracts a tiny JPEG even though CR2 commonly embeds a full size JPEG

Thumbnail extraction using DiskTuna JPEG Repair

JPEG Repair may be less automatic and dumbed down, it can also extract embedded JPEG data from corrupt JPEG and RAW photos. But, you need to specifically tell it to by selecting the appropriate tool ‘Extract JPEG’.

Then click the file browser button to select the file(s) you want to extract embedded JPEGs from. The file browser windows also allows you to select a minimum resolution!

To extract JPEGs, select source file(s) AND set minimum resolution

To extract JPEGs, select source file(s) AND set minimum resolution

Depending on the camera and file type (RAW vs JPEG) a photo may contain 1, 2 or 3 embedded JPEGs. For JPEG it’s typically 1 or 2. RAW files often contain 2 but also some times 3 embedded JPEGs. In case there are 2 embedded JPEGs you’ll usually find one tiny thumb (160 x 120 px. for example) and one full sized JPEG. In case of 3 embedded JPEGs it is often one tiny thumbnail, one medium size (1 upto 1 MP) and one full sized JPEG. By full sized I mean that if your camera creates for example 12 MP RAW photos, the full-size embedded JPEG is also 12 MP.

If we look at the same CR2 files as used in Stellar Repair for Photo, by telling JPEG Repair we want at least 3 MP JPEGs we cause it to skip the 120 x 160 JPEGs that Stellar’s tool extracted. Now click OK and then click Repair. Unlike Stellar Repair for Photo, JPEG Repair extracts full resolutions JPEGs from the exact same corrupt CR2 files. So not only is JPEG Repair able to do so, it even performs better than the Stellar software.

JPEG Repair is able to extract full resolution JPEGs from the corrupt photos.

JPEG Repair is able to extract full resolution (5184 x 3456) JPEGs from the corrupt photos.


Why is photo repair more expensive than photo recovery?

$
0
0

I offer two services; photo repair and photo recovery. I question I sometimes get is, how is it possible you recover hundreds of photos for a flat fee of $59,95 while the repair of one single photo can be as much as $17.85 or even more per file? (Photo Repair Pricing vs. Photo Recovery Pricing).

This is an interesting and logical question.

Fair prices

I try to make it so that my prices reflect the amount of work I have to resolve an issue. So from that you can conclude that repairing a single photo requires me more work that recovering a single photo. Indeed I have repaired photos that were so corrupted that the price of this repair was not far from what I ask to recover hundreds of photos from a corrupt SD Card or USB Flash drive.

Why is that? For the answer we have to look at how data on computers in general is organized.

How data is organized

Most data that is stored on a computer consists of the actual data, let’s say the payload, and meta data describing the data.

So, a file system on which you store files consists of meta data and the actual file data. And by file data I mean the text you produced on a word processor or the photo that you created using your camera. The meta data stores filenames (among other things) and the actual locations of file data within the file system. Corruption in meta data is what in general results in data loss. To recover data, we need to ‘guess’ where files are stored in order to recover them.

An example of file system meta data pointing to a payload, in this case, files.

An example of file system meta data pointing to a payload, in this case, files.

A file in itself often also contains sort of a mini file system. I file very often consists of multiple sections. The meta data, often found at the start of the file, points to those different sections much like file system meta data points to individual files. If we look at photos specifically the meta data also contains data that is needed to decode and decompress the actual payload. The payload being the binary image information. Corruption in meta data will result in a corrupt file. We need to make guesses about the meta data to repair it.

An example of meta data pointing to encoded image data ..

An example of meta data pointing to encoded image data ..

In essence, figuring out missing links in file system meta data is not all that different from finding them in a single photo. Both the photo and the file system are one ‘unit’ containing meta data and a payload. To retrieve this payload the meta data needs to be figured out.

The price for recovery is for the work that’s needed to work out the meta data. Whether this is meta data for a file system (photo recovery) or an individual file (photo repair).

Of course there are other factors into play, so this is quite simplified. For example, for recovery I may need to work around read errors and instability of a device that occurs because of that. This requires specialized hardware which is quite expensive which needs to be reflected in the price too.

If we consider file repair, it’s not uncommon that is damage is limited to meta data, repair of multiple files with the same issue can be automated. IOW, if I repair one header, then the same repair can be applied automatically to the other corrupt photos too. In general if this is possible I will reduce the price to the level of one photo recovery, regardless the amount of photos.

What if the payload is damaged or corrupted too?

Of course apart from the meta data, the actual data it’s pointing to can become corrupt.

If this is the case at the file system level, so part of the drive that stores actual data, then often this data can not be repaired. You’ll for example see this when one head of a mechanical hard drive fails. It will corrupt large chunks of data that is beyond repair even though the meta data pointing those areas is still intact. A data recovery lab will try replacing the head assembly with the one from a donor drive. Sometimes however partial data recovery is all that is possible.

When we focus on photo repair, this are often the most expensive repairs that can not be automated. For this type of repairs it’s not enough to find a person who can perform magic with Photo Shop. As photo data is a continuous stream if encoded and compresses data, any disruptions will often affect all data following it. To minimize these, corrupt data must be removed and then the raw data is manipulated to minimize the effect on the visual image. This manipulation of the raw data consists largely of trial and error and observing the effect. It’s the time needed to get it right that makes repair of such photos so expensive. Often these kind of repairs are not perfect so additional work is needed using Photo Shop or a similar tool.


Recovering data from an unstable flash drive

$
0
0

Recovering data from an unstable flash drive often proves to be a lot harder than recovering data that was lost due to deletion or accidental formatting. This is due to the fact that data recovery software is written to address issues at the ‘data level’ while often instability issues are at the ‘disk level’. What I will discus in this post basically is true for all types of drives (flash or spinning) although there are differences.

Three levels of data recovery

DeepSpar, a manufacturer of professional data recovery hardware discriminates three levels of data recovery:

  1. Data level: These include logical issues which basically means meta data that is needed to locate files are corrupt or missing. Data recovery software can be used to work around these problems by reconstructing a virtual file system.
  2. Disk level or Drive instability issues: These often provide a too large challenge for data recovery software due to read access problems. As data recovery software has no direct access to the hardware and lacks the ability to monitor and adjust drive access it is at the grace of the operating system to handle such problems. This means data recovery software is no better equipped to deal with such issues than say, Windows Explorer. If disk access takes too long Windows may simply decide to disconnect such a drive.
  3. Drive level: Problems at this level require hardware repairs. In case of a conventional hard drive, the read/write heads may need to be replaced. In case of flash based storage devices the PCB may require repairs or in a worst case NAND chips have to be dumped directly, from that logical image has to be re-assembled.

In other words, in order to be able to use data recovery software, issues at drive and disk level need to be addressed first. In this post I will leave drive level out of consideration. Such issues will need to be addressed by a full blown data recovery lab. Disk level issues may be do-able if you’re willing to take a risk. The cost of this risk is say roughly $250-$500. These are prices many specialized data recovery services and labs charge for this type of data recoveries. These services and labs have a better chance or reducing the risk of total failure and to recover your data.

Dealing with Disk level or Drive Instability Issues

The OS

Hurdle one is the operating system. Of course a major task of any OS is to give you access to your data. In order to do so it will investigate what it can find on drives attached to the system. It will read and interpret meta data, update various logs and so on. When dealing with an unstable drive it’s however what you do not want it to do! Only reading meta data alone accounts for megabytes worth of data. An accidental read error in any of those meta data structures will trigger the drives own error recovery routines, and if those fail, the OS will request the data again and again. Both Linux and Windows can however be instructed to leave a drive alone to circumvent this problem to a degree.

Logical data recovery software

Although we’re dealing with a flash based drive rather than a disk, the principle remains largely the same. Instability issues are frequently caused by read errors. Since data recovery software relies in Windows to access and process those sectors, it can not do anything else than wait until Windows is done. However, it is not uncommon for Windows to disconnect a drive when processing takes too long. In my testing many data recovery software will stubbornly try copying remaining sectors (read error returned each time) or simply freeze.

Drive cloning or imaging

To deal with this at the DIY level you would need to isolate the data level issues from disk level issues. What I mean is, you first try cloning/imaging the drive (to address the disk level issue) and then run data recovery software to address the data level issue. If a drive is however bad enough you will run into the limitations of software based drive cloning and imaging: Bad sectors will take an incredible amount of time to process and the drives own error recovery procedures (re-reads) can not be prevented. So not only will take imaging impractically long, it will also further deteriorate the drive’s condition with the potential danger of it failing completely.

At some point the drive may become unresponsive completely and in such a case power cycling it is the only way to get it going again. On some drives this happens every 100 Megabytes for example. Power cycling can then sometimes be automated (see https://youtu.be/DHykaRlfRwc and https://youtu.be/v1ql6yNS0qk). However, for spinning drives power cycling is stressful to.

Okay, so what can a professional service do?

If we leave physical repairs out of the equation, a professional data recovery service has to perform the same balancing act: The get the data we need to read the drive, but reading it stresses the already unstable drive. So ultimate goal is to get the data while stressing the drive as little as possible so it survives for at least the duration of the recovery. And by recovery I basically mean the drive imaging / cloning process. As soon as we have that more than half the battle is won!

Machines!

Some times data recovery machines come as sexy little units ..

Some times data recovery machines come as sexy little units ..

The solution data recovery services and labs use are hardware based. Unfortunately this is without exception expensive equipment often requiring yearly license fees. The idea is to use hardware that:

  • Isolates the drive from the OS (to prevent destructive mounting and reads)
  • Allows monitoring of drive behavior (Speed alone can be very telling but also error/response codes)
  • And allows disk access parameters to be tweaked (By specifying time-outs prevent drive from doing error recovery)
  • Automatic software/hardware resets or power cycling based on certain events
  • Even more advanced hardware even allows manipulation of the firmware of drives (stop self scanning for example)

And experience ..

This hardware can be controlled by software. Some times the sole purpose of the hardware/software is strictly isolating, monitoring and adjusting disk access while additional software is used to create the disk image. Other tools even offer integrated drive imaging and logical data recovery.

But it’s mainly the ability to monitor and adjust drive behavior and prevent the drive from self destructing.

Something as simple as automatically powering down a drive when idle for more than a few seconds can make a world of difference: An idle drive will start doing maintenance, something you do not want an unstable drive to do. These are measures, seemingly simple, that will increase the chances the drive stays alive and will give us the data.

Experience comes into play when interpreting drive behavior determining how to tweak the different parameters. But by tweaking for example read time-outs alone, stress on a drive and time needed to image can be reduced dramatically (4 hours to image the drive rather than 20 greatly improves the chances the drive unstable will survive).  What kind of reset to use if an unrecoverable error occurs? A software reset is less stressful than a power cycle in many cases. However certain drives go into a sort of panic mode that will not process software resets and the only way to pull them out is a power cycle.

DiskTuna Data Recovery Service

I offer a photo repair service for quite a while now. Frequently people send me photos that are the ‘product’ of file recovery attempts. Most times recovery is performed using end user file recovery software but by sometimes data recovery services too. If a file is incorrectly recovered it will be corrupt because it simply hasn’t got all photo data or even none at all. In such cases the only thing that makes sense to go back to the source and try recovering the files intact.

So occasionally I allowed for people to send memory cards to me so I could try recovering them. Issues vary from severely corrupt file systems (data level issues) but sometimes it was a struggle to even get a card to read (disk level issues). When I considered offering a photo and memory card data recovery service I knew I needed something that would:

  • Allow me to to a degree guarantee that I would never write to the patient drive
  • Prevent Windows from freezing when confronted with patient (Windows is my main OS)
  • Allow me to work with unstable drives at least. At this point I have no desire yet to do chip-off recovery though I may very well expand into that direction in the future

DeepSpar data recovery hardware

So, people who send in their memory cards for recovery can be certain every precaution is taken to reduce risk of further damage and to achieve best possible results. Creating a drive image is always the vital first step in the data recovery process. Using special data recovery hardware will also allow me to process cards that can not be using software alone.


Recover photos from a hard drive

$
0
0

To recover photos from a hard drive, in 9 out of 10 cases generic file recovery software will do better, give less fuzz and be quicker than specialized photo recovery software.

In advance: SSD is different.

Now before I will give a more detailed explanation it’s important to be aware of the fact that I’ll be discussing what happens at the file system level. If you’re using an SSD this whole exercise becomes somewhat moot as in specific scenarios the SSD will make data unrecoverable due to a thing called TRIM. This also applies to so called SMR spinning hard drives.

Why is it  bad idea to use photo recovery software on a hard drive?

Reason that I am doing this post because on various forums etc. I see people trying to recover their photos from hard drives running into all kinds of issues. Reason is that really specialized photo recovery tools are so called ‘raw scanners’ or ‘carvers’. This type of tool typically comes with some important drawbacks:

  • Needs to scan entire drive so is slow
  • Does not recover original folder structure and file names
  • Tends to produce false positives, it ‘thinks’ it may have found a photo while it didn’t
  • Tends to also produce many corrupt files
  • Can not handle file fragmentation unless you use even more specialized carvers
  • On a hard drive potentially produces thousands and thousands of photos for you to sort out

All in all it makes recovery of photos from a hard drive a huge undertaking. Some examples of such tools are PhotoRec, and also my own JpegDigger. This type of tools only makes sense if the file system on a hard drive is destroyed or if generic software fails.

Advantages of using generic file recovery software to recover photos 

This is why I advice you to first try recovering photos from a hard drive using a good, generic file recovery program. My personal goto tool is ReclaiMe.

If we look hard drives today, and I am limiting myself to Windows systems as I am a Windows user, the drive will be formatted (most likely) using the NTFS or exFAT file system. If you lost photos due to formatting or deletion, file system meta data pointing to that file will be largely intact. This is why in many situations a generic file recovery tool will be able to recover:

  • Intact files even when fragmented
  • Recovers filename
  • Recovers directory structure
  • Only scans file system meta data, so a lot quicker compared to raw scanners

Generic file recovery software recovers any type of files. Just because it doesn’t explicitly address photos doesn’t make it unsuited to use it for photo recovery. When it comes to file deletion or recovering photos from a formatted drive there’s nothing special about photo files. The photo format does not matter either, whether it’s JPEG, PNG, CR2, NEF etc..


Viewing all 281 articles
Browse latest View live