Quantcast
Channel: DiskTuna // Photo Repair & Photo Recovery
Viewing all 281 articles
Browse latest View live

Recover RAW photos using JpegDigger

$
0
0

JpegDigger is a JPEG carver. As such you may not expect it to be useful to recover RAW photos. However I have been able to put it to good use in a number of cases where:

  • RAW photos were lost or deleted
  • Photos appear corrupt on memory card
  • RAW photos were corrupt after recovery
Example of a corrupt RAW photo after recovery

Example of a corrupt RAW photo after recovery

JpegDigger does detect and recover data from RAW photos based on the TIFF file format. Examples of TIFF format based RAW photos NEF (Nikon), CR2 (Canon), ORF (Olympus), RW2 (Panasonic-Lumix, ARW (Sony) and DNG (Leica). However, when it detects a RAW photo it will examine it and try to extract JPEG data rather than recovering the RAW photo itself. This ability can be the difference between no recovered data at all and at least recovering the high resolution JPEG.

Using JpegDigger to recover JPEG data from RAW photos

Many RAW photos embed several JPEGs rather than just one, some times as many as three. And many embed one full resolution JPEG, which is the one we want to recover.

  • Download JpegDigger.
  • Run JpegDigger.
  • Select the memory card’s drive letter
  • Set minimum resolution. As we want to skip smaller JPEGs we need to set the threshold. In most cases (all I have seen so far) setting minimum resolution to 3.0 MP will skip all lower resolution JPEGs and recover the full frame JPEG.
  • Tick the autosave option if you want to save files automatically.
  • Click Scan. You will be prompted automatically to select a destination folder.
Recover full resolution JPEGs from lost and corrupted RAW photos

Recover full resolution JPEGs from lost and corrupted RAW photos

JpegDigger shows previews for each photo it finds. It lists start sectors for those files in the list on the right side of the window. These start sectors are the basis for the file names that JpegDigger assigns as it will simply add a .JPG file extension.


The post Recover RAW photos using JpegDigger appeared first on JPEG Repair | Photo Recovery | File Recovery | Video Recovery.


Undelete and photo recovery find no data on formatted SD Card

$
0
0

Case: SD Card is accidentally formatted in Windows (10). Some popular recovery tools are tried; Recuva from Piriform, Recoverit Photo Recovery from Wondershare and Stellar Photo Recovery. Recoverit and Stellar Photo recovery are basically nothing else than dumbed down versions of their generic data recovery tools. They fail to detect any data. In this video I will demonstrate this using Recoveit, however Recuva and Stellar had same result.

How to explain this and how to recover the photos?

Quick format

Normally a quick format on a memory card in Windows leaves the data intact, it is only the file system that is reinitialized. So in this case an easy recovery was expected, however two of the more popular goto tools for many fail to recover the data.

Format determines layout of the file system

To understand why this may be, it is important to look at the FAT32 file system layout:

BS FAT 1 FAT 2 Data Area

Roughly the file system starts with a boot sector (better: boot area as > 1 sector in size), then a file allocation table and a copy of that and finally the area containing the actual data. The boot sector describes parameters such as cluster size, size per FAT and various offsets to various structures. Of course the size of the boot area, cluster size, and FAT sizes are important to calculate where the actual data is. Assume an actual file starts at cluster 100. To ‘know’ where the file is you should know the size of the boot area, the FAT and the cluster size: File location = Size BS + (size FAT * 2) + (Cluster * cluster size).

These parameters are set at the time the drive is formatted. It is very well possible that a camera’s firmware and Windows Format use slightly different parameters when formatting the drive. And this is probably what happens in this case. If even only the size of the boot area is ONE sector different finding the rest of the data may be problematic.

Recovering the data

In general photo recovery tools fall in to two categories: File system based and carving. Carvers are theoretically file system agnostic but often try to interpret the file system to speed up scanning. As file system divide a drive up into clusters, knowing the start of the data area and the cluster size offers advantages over the need to scan all sectors: Assume a 32 KB cluster size then this limits potential file starts by a factor of 64.

File system based recovery

Recuva, Recoverit and Stellar Photo Recovery are file system based recovery tools but they both also are capable of file carving. It appears however that IF boot sector data is available they rely on this data to orient themselves on the drive. IOW, if the boot area tells the tools ‘I am 32 sectors in size’ they base all their calculations on that value.

Let us assume Windows created a 32 sector sized boot area while the camera set this value to 33 (for block alignment purposes) then all calculations will be 1 off! This mean not only will the tools have trouble interpreting file system structures, but even when carving they miss all file starts! And this probably explains why both Recuva and the Stellar software fail to detect the photos.

Recovery by carving

As mentioned due to a typical case of ‘one off’ all file starts are missed when assuming the file system parameters to be correct. As a matter of fact JpegDigger also fails to detect any photos initially (see video below). We can however tell JpegDigger to ignore the boot sector and specify our own parameters.

Theoretically we could manually set start sector to 0 and block size to 1 (= 512 bytes) to detect all files. However, as this will force JpegDigger to treat each sector as a potential file start it will make scanning slow. Ideally we want it to check at cluster size boundaries: After all the file system stores files at those boundaries.

We use the ‘Help me determine values’ option in the override window to detect correct settings. As the video shows photos it then detects photos.


The post Undelete and photo recovery find no data on formatted SD Card appeared first on JPEG Repair | Photo Recovery | File Recovery | Video Recovery.

JpegDigger future plans and entropy in JPEG data

$
0
0

When I first started working on JpegDigger it happened based on the case I had at hand. Typically a customer asked me to repair corrupt photos and the (my) diagnosis was that the corruption was either due incorrect recovery or a corrupt file system (rather than individual corrupt files).

And then at some point I wrote all that in a more or less generic RAW recovery algorithm with some on the fly error repair and rule of thumb reassembly of non contiguous files. That is basically the current status.

Things that are on the to-do list as far as I am concerned are (in no particular order):

  1. Ability to process disk image files. Currently I mount disk images using OFS Mount.
  2. Option to create a disk image, probably limited to external disks such as memory cards.
  3. List physical drives and make it possible to scan those.
  4. Entropy map.

Assuming the first 3 are self explanatory, I will describe 4 a tad more detailed:

JpegDigger Entropy map

The problem

There are a few common problems I encounter when dealing with issues brought to me by my customers:

  1. Empty files or files not containing actual JPEG data. Empty files are often the result of fake memory cards. On these cards the file system points to non existing memory. Files that are copied or recovered are therefor empty. Files not containing JPEG data are often the ‘product’ of file or photo recovery and undelete software. The software finds a pointer to a JPEG file and uses it to recover clusters associated with the file. Either the pointers are incorrect or the file was overwritten with new data.
  2. Encrypted files which are recovered from memory cards used in Android or Apple smart phones. Files were individually encrypted, file system points to JPEG files. The recover software saves the photos as such.
  3. Card is simply empty. The photo recovery software scans the memory card and finally simply reports that no files were found. This is often very frustrating as the question why photos can not be recovered remains without answer. I have worked on cards that were kept for years in the hope that some day the data can be retrieved.

I think calculating entropy and displaying that in some form can address these issues.

Entropy in JPEG data

Entropy is a measurement for ‘chaos’. High entropy means a high degree of chaos, low suggests order and predictability. Limiting myself to data, a property of compressed data is high entropy. Encrypted data can often be detected by the highest state of entropy.

Low entropy example: 0x00, 00, 00, 00, 00 etc.. Or 0xFF, FF, FF, FF, FF and so on. Almost by definition this is uncompressed data as the latter is easily compressed by (0xFF)*5.

One property of JPEG data is that it is compressed. So, if we would calculate entropy for each block we scan we can detect:

  • If data is present at all
  • Encrypted data
  • High entropy compressed data

Entropy map and what it can tell us

The JpegDigger entropy map is not a definitive answer but a useful tool to determine if data can potentially be recovered. It must be noted that high entropy as a result of compression is not exclusive to JPEG but can also indicate ZIP files, MP4 data etc..

High entropy in first part of memory card suggests JPEG (compressed) data

High entropy in first part of memory card suggests JPEG (compressed) data, largest part contains no data. Visually represented by JpegDigger entropy map.

In above illustration entropy map shows high entropy data for a good part of the first half of a memory card. The largest portion of the drive does not contain any data. A completely black entropy map tells us the drive contains no data at all. A largely cyan map means the data is largely the result of encryption. In the latter 2 cases recovery software is no solution for the data loss.

The video shows how no detection of JPEG files although the entropy map shows high, JPEG like entropy. Since the card is used to store photos we can assume the data is present and something else is wrong. In this case the software was not using a correct set of parameters: the software tries to divide the drive in logical blocks to reduce the time required to scan. In order for this to work it needs the correct block size and the correct offset to the first block. To determine these values it interprets the boot sector BPB (BIOS parameter block which in this case was corrupt. JpegDigger contains a tool to help determine correct values. After I used it JPEG files can be recovered.

In this case the entropy map gave a valuable hint: There is data and if you’re not detecting it you’re doing something wrong.


The post JpegDigger future plans and entropy in JPEG data appeared first on JPEG Repair | Photo Recovery | File Recovery | Video Recovery.

Recover photos from Android Micro SD Card

$
0
0

Probably Android phones are the most common devices to take photos with nowadays often stored on a Micro SD Card. Consequentially many lost photos will be on Android devices. Photos can be on:

  • Internal memory
  • (Micro) SD Card

Although many want you to believe it is easy to recover the lost or deleted photos and success is guaranteed, it often isn’t. In this post we’ll look into what’s possible and what’s not. We’ll describe how you can use JpegDigger to attempt photo recovery. JpegDigger offers some features not found in other software like:

  • On the fly file repair
  • Attempts to put together non contiguous JPEGs
  • Entropy map which allows you tell if media contains data and data encryption.

Recovering photos from internal memory

You can only do this from Windows and using JpegDigger if the phone can present itself as a ‘mass storage device’. Unfortunately this mode is longer available in  modern Android versions. If you have an older Android version (pre 4.2) find the option to enable ‘USB Mass Storage Device’ mode. A dialog will pop up when you connect the phone to a PC using a USB cable allowing you to select this mode.

Option does not appear:

  • Go to Settings -> About Phone/Tablet.
  • Go to “Build Number” at the end of the Scroll list.
  • Tap on “Build Number” 7 times (seven!)
  • Now Developer Options will be visible in settings list where you can enable USB debugging > OK. Done.

On even older Android versions try: Menu > Setting > Applications > Development > USB debugging. Or, Settings > More > USB utilities > Connect Storage to PC.

So, idea is to get the Phone a drive letter assigned in Windows Explorer.

Alternatives:

  • Alternatively use software that is able to access the Android device in MPT mode. AFAIK the phone needs to be ‘rooted’ for this to work.
  • Use Android software that runs from the device itself. For example DiskDigger (Can be found in Google Play Store). Drawback of the method is that the software will be stored on the same memory you want to recover from and may potentially overwrite the deleted data.

Recover photos from a Micro SD Card

To recover data from the SD or Micro SD card, remove the card from the phone and insert in a card reader connected to a PC. Now you can now proceed as if you were scanning any drive using JpegDigger:

  1. Select the drive letter
  2. Select a maximum file size and minimum resolution, normally defaults are okay
  3. If you want to scan for deleted files only, check the ‘Only free space’ option.
  4. Click Scan

Android phones can encrypt files on the memory card!

Encryption can be per volume or individual files. These encrypted files can not be recovered. A common issue people encounter is photo recovery or generic undelete tools either put up a message stating no files are detected (entire volume is encrypted) -or- files can actually be recovered however it is impossible to view them (file content encrypted). I very often receive such files for my JPEG Repair Service, nothing I can do to repair those.

Card may be entirely empty depending on what happened to the data.

Depending on the specific smart phone there are circumstances that may wipe all data from the SD memory card. Typically photo recovery software will report ‘no files found’ or ‘no data found’.

No data found, Stellar.

JpegDigger calculates an entropy value for the data on the SD Card. Using this value it is possible to differentiate between absence of any data, possible photo data and encrypted data.

To Scan the (Micro) SD Card using JpegDigger and try to recover your photos:

  1. Download JpegDigger
  2. Open the archive (ZIP) and extract to a location of your choice (no setup)
  3. Double click JpegDigger.exe
  4. Select the card’s drive letter
  5. To automatically save files check the autosave option
  6. Click Scan
High entropy, possible JPEG data!

High entropy, possible JPEG data!

JpegDigger translates entropy values to a color and displays this in the form of the entropy map. Using the entropy map you can determine:

  • The card contains no data or a repeating byte pattern. It means all data was erased and is beyond recovery
  • The memory card (mainly) contains encrypted data which can not be recovered without the decryption key
  • Bright green indicates the card contains high entropy data. JPEGs mainly consist of compressed data which results in high entropy

In case JpegDigger displays high entropy data yet no files like in the above example: Cancel the scan > Click ‘Override’ > click ‘Help me determine values > OK to accept values > Scan the card again.


The post Recover photos from Android Micro SD Card appeared first on JPEG Repair | Photo Recovery | File Recovery | Video Recovery.

Partial full format on SD Card, can I recover photos?

$
0
0

You can not recover if you let a full format complete.

It depends if the full format was allowed to complete. A full format overwrites data. Overwritten data can not be recovered. So in case the format operation had the chance to complete, you can stop reading here, nothing and no one will be able to recover the data. The format operation in some brands and types digital cameras is in fact a full format. Sony cameras often do a full format. You may however be able to recover data after a partial full format.

In case you discover an accidental full format in progress, interrupt it.

If you stopped the full format in time.

I can case you discovered your mistake in time and stopped the format, the data not yet overwritten can be recovered from the SD Card. If the full format was at one third for example, photos stored in the remaining 66% of the card are recoverable.

Since the format operation is not complete most likely the file system on the card will be ‘RAW’. It may state “the volume does not contain a recognized file system, make sure all required file system drivers are loaded and that the volume is not corrupted”. Windows may prompt you to format the card.

the volume does not contain a recognized file system, make sure all required file system drivers are loaded and that the volume is not corrupted

Do NOT format the card!

How to recover photos after a partial full format of an SD Card.

You many find that popular free tools like Recuva may be incapable of recovering the data.

Recuva can not deal with a partial full format

Recuva can not deal with a partial full format

JpegDigger may be able to help though.

Recover photos after partial full format using JpegDigger

  1. Download JpegDigger and extract JpegDigger.exe. There is no setup to run.
  2. Run JpegDigger
  3. Select the drive. JpegDigger will probably display one or more error messages stating it can not determine the file system. Just OK those messages.
  4. Click Override. Now select the card’s size and click ‘help me determine values’. Depending on how much data was overwritten this may from a few minutes up to an hour!
  5. Click OK to accept values
  6. Click Scan. Depending on card size this may take an hour.
  7. Click ‘Select all’ > ‘Save’. I recommend simply saving all files and sort them later.
Determining file system parameters may take quite some time ..

Determining file system parameters may take quite some time ..

Note that JpegDigger shows an entropy map. The black area(s) indicate parts of the drive containing no data at all. If the map is black completely, all data was already overwritten.


The post Partial full format on SD Card, can I recover photos? appeared first on JPEG Repair | Photo Recovery | File Recovery | Video Recovery.

Is ReclaiMe still the recommended all-round data recovery tool?

$
0
0

The best all-round data recovery tool for end users.

Every now and then I test against updated versions of most popular file recovery software out there. Until now updated versions of Stellar, Clever Files (Disk Drill), Easeus, Minitool etc. did not make me change my mind. In fact, some of the updated versions feel like a step back compared to earlier versions. ReclaiMe simply produces better results and is easier to use (although the latter is somewhat subjective, I admit). It’s faster too in many scenarios, often you can view and copy data in a matter of minutes while competing software is far from producing and displaying a directory tree.

Compared to professional grade data recovery software: ReclaiMe shares the excellent recovery capabilities with it’s professional counter part ReclaiMe Pro. As such it’s efficiency is comparable to professional grade software like R-Studio, FileScavenger and UFS Explorer. ReclaiMe Standard and Ultimate are much easier in use though. Advantage of such pro grade software is that it is frequently updated based on experiences and requests of professional data recovery engineers. For a large part this explains why this type of software outperforms other file recovery software.

Compared to consumer grade data recovery software: There are too many too list in this category, however the most popular ones would be Stellar, Easeus, Minitool, Disk Drill, Recoverit and many more. In my opinion, which is based on 20+ years of experience in writing, testing and using data recovery software, ReclaiMe beats each and every one of these with regards to recovery results and ease of use. And then I haven’t even touched a subject like data recovery from NAS devices,  something that the majority of popular tools isn’t even capable of.

So yes, in my opinion ReclaiMe File Recovery still is the recommended all-round data recovery tool.

What about Ontrack Easy Recovery?

Every now and then I get the question why I never mention Easy Recovery from Ontrack. This is because Ontrack never actually produced it’s own software. Their first ever software under the brand Easy Recovery was actually produced by a company they purchased. Original software was called ‘Tiramisu’. And since then they simply licensed software from various companies such as Stellar and LC-Tech. So, the software is not original and also it is never actually an upgrade built upon experiences from previous versions.

ReclaiMe step by step

  1. Download ReclaiMe. It is wise to save the software to a different drive than the one you want to recover files from.
  2. Install it
  3. If the disk has physical issues, best to image it. I explained how to do this in this post.
  4. Run ReclaiMe File Recovery. It will start with detecting disks and file systems, this will take some time.
  5. Select the drive containing the lost data
  6. Click Start
  7. 9 out of 10 times ReclaiMe will be able to detect you files within a few minutes after which it pauses the scan.
  8. Select your files and save them to another drive by clicking Save.

Select Drive

ReclaiMe File Recovery all-round data recovery tool. Select drive.

Drive Scan in progress ..

All-round data recovery. Disk scan in progress. you can already preview and save data!

Initial scan finished in less than 2 minutes ..

All-round data recovery. Scan finished in less than 2 minutes and detects over one million files!

Select your files and click Save

All-round data recovery. Select files and click save to recover your data

The post Is ReclaiMe still the recommended all-round data recovery tool? appeared first on JPEG Repair | Photo Recovery | File Recovery | Video Recovery.

AKAI MPK mini play drum pads and Ableton Live drum pack misalignement

$
0
0

This post has nothing to do with data recovery and/or photo repair! This post explains how to make the drum pads of the AKAI MPK mini play work with MPC Essentials and Ableton Live. Don’t let these problems discourage you! There is a huge community to help you out and once you have it running the AKAI MPK mini play is awesome!

AKAI MPK mini play MIDI keyboard/synthesizer

I recently purchased an AKAI MPK mini play MIDI keyboard/synthesizer. It’s basically the same as a keyboard, but rather than for typing text you use it to play music. To actually type a document with a regular keyboard you need a text editor. It’s the same with a MIDI keyboard, to play actual music you need software.

The AKAI MPK mini play comes with some full software (Hybrid synthesizer for example) but the main DAW software is a function limited version. This type of software normally allows you to record one instrument on top of another (drum > bass > melody) but the AKAI limited version only allows one of those ‘layers’.

However! A cool feature if this particular model is that you’re also able to use it as a stand alone instrument. It comes with a number of instruments and drum kits built-in. For me this was important because my daughter also needed a keyboard to practice for music lessons at school.

The AKAI MPK mini play MIDI keyboard

The AKAI MPK mini play MIDI keyboard

Making hardware and software work together

The MIDI keyboard itself is plug-and-play. Connect it to USB and Windows 10 will recognize it. It took me hours to make it play nice with the accompanying software however. For example the physical drum pads on the device did not correspond with the drum pads in the software. To fix that you’d need to program the keyboard. But fortunately I was not the only one running into this problem and a nice person shared his settings into a file that I was simply able to load into the software for programming the keys on the keyboard.

I was now able to load a ‘drum kit’ and play it by tapping the drum pads on the MPK mini play. However as mentioned this function limited software was really limited so I decided to buy a ‘DAW’. This is what this type of software is called and it’s short for Digital Audio Workstation. I settled for ‘Ableton Live’.

Now I discovered Ableton Live was unable to work with my drum pads. Again they didn’t line up with the virtual drum pads in the software on which you drop a drum kit. Tapping the physical pads revealed different virtual pads ‘all over the place’ were activated with no instruments assigned to them. The MPK mini play features 16 pads (8 physical but you can switch between 2 banks using a key), the software many more virtual pads.

After a journey of several hours, learning you can make Ableton load configuration files which I found to be too complex I decided to remap keys using the programmer. As I could not find fellow victims who had done this before me and made settings files available to fix this problem.

AKAI MPK mini play key-maps for MPC Essentials and Ableton Live

You can download the key maps that work for me. The ZIP file contains key maps for both MPC Essentials and Ableton Live.

Download the ZIP containing files to program the drum pads for use with MPC Essentials and Ableton Live.

Unzip the file you downloaded from this website.

You also need the editor which you can download here.

Install and open the editor. Click File > Get Favorite, select one that is free.

Now click File > Open Favorite and browse for the .mpkplay files. Select the one you need (AbleTon_Live or MPC_Essentials).

Click File > Send Favorite > Select a free Favorite.

Some vids to show how amazing this MIDI keyboard is

Amazing original content:

An awesome Alan Walker cover:

Demonstration of built-in instruments of the MPK mini play:

The post AKAI MPK mini play drum pads and Ableton Live drum pack misalignement appeared first on JPEG Repair | Photo Recovery | File Recovery | Video Recovery.

You must initialize the disk before Logical Disk Manager can access it

$
0
0

When Windows Disk Manager does not find partitions it will display the message “You must initialize the disk before Logical Disk Manager can access it”. In other words the hard disk, SSD or removable device is “unallocated” or not partitioned. What does this mean and how do you recover your data if you need to? The main focus of this post is data recovery.You must initialize the disk before Logical Disk Manager can access it

Related: The volume does not contain a recognized file system.

In general, if all of a sudden data disappeared then recoverability is good if:

  • Don’t initialize the disk! This is especially dangerous on an SSD as Windows may send a TRIM command to the device. In general when that has happened data is unrecoverable. Note that some modern conventional hard disks support TRIM commands too! In that case data may still be recovered using professional data recovery hardware/software in a data recovery lab.
  • Do not write anything to patient disk!
  • The issue is logical rather than physical. Main give-away of the issue not being logical is the physical disk size in disk management. This should reflect the actual size of the disk (or even SD Card for that matter). Physical issues (or firmware issues) often present them self by the disk size being 0 MB, or 30, 31, 32 or 33 MB. This can only be addressed by a professional data recovery lab.
Disk management reveals the physical disk size as Windows sees it (Disk 0, Disk 1)

Disk management reveals the physical disk size as Windows sees it (Disk 0, Disk 1)

TRIM in short:

SSD drives need free space to store data, they can not just overwrite existing data like conventional hard disks. To make operations faster they write data to free blocks rather than erasing old data first. Erasing is takes place in the background on blocks that Windows indicated are no longer needed. The method to make a SSD know this is called TRIM. On most SSD’s these blocks are no longer accessible so the data can not be recovered using consumer grade file recovery software.

Uninitialized due to a logical problem

To store data on a hard disk or SSD, Windows (and other operating systems) needs a file system. A file system is a structure in which the OS can store files. To create a file system the disk needs to be partitioned, partitioned space can be formatted.

If the uninitialized disk does not contain data you need to access, you can initialize the disk. After initializing the disk can be used to store data. Initializing will create partitions, format the partitions (create a file system) and assign drive letters to the newly created volumes.

Recovering data from an un-initialized disk using file recovery software

Why ReclaiMe File Recovery?

recover data when volume does not contain a recognized file system

Scenario: “You must initialize the disk before Logical Disk Manager can access it”.

Using ReclaiMe itself is simple and straight forward. Once you have the system set up, you’re just a few clicks away from recovering your data.

ReclaiMe File Recovery

File Recovery doesn’t get easier than this!

ReclaiMe File Recovery for data recovery from hard disks, external disks, flash media and NAS. $79.95

  • Windows: FAT, FAT32, exFAT, NTFS, ReFS.
  • Linux: Ext2/3/4, XFS, BTRFS.
  • Apple: UFS, HFS, HFS+ and APFS.
  • No technical skills required to operate the software
  • NAS data recovery, no additional tools required
  • RAID data recovery, with free add on.
  • Fast! Often you can start viewing and recovering your data within minutes!

Read more about ReclaiMe File Recovery!

94% success rate – Unconditional, no questions asked, 30 day money back guarantee!

We need:

  • A running Windows system. If it is the system drive that is corrupt, you will need to remove it from your computer and attach it to another PC. An inexpensive USB enclosure is a convenient way to attach the disk to another PC or laptop.
  • ReclaiMe File Recovery.
  • The ‘patient’ disk from which you will be recovering data.
  • A destination disk where you will copy files to.

Now, run ReclaiMe File Recovery Software. All you need to do is

  1. Select the physical disk (Disk [number]) and
  2. Click Start.
  3. A few minutes is normally enough to detect all files. ReclaiMe will then pause the scan and allow you to recover your data.

Detailed steps to recover your data:

ReclaiMe displays the model name and size of the disk. It gathers a device self-diagnostics information as well (S.M.A.R.T.). The program selects the color of the icon for a particular device according to the self-diagnostics data. Gray color means that a device is in good condition which corresponds to a normal (working) state; red icon color indicates that a hard drive (or one of the drives in a complex volume) is faulty.

recover data from an un-initialized disk

ReclaiMe will normally almost immediately start populating the folder / file lists. You can already preview text and image files. You can also search for and save files (using the Save button).

Wait for the number of files in the left bottom corner if the windows to settle, you can pause the scan (usually after 2% – 3% scanning). See if the files you need to recover are listed and recover (Save) them. You can resume the scan if needed.

This short video also explains the entire procedure:


Software to repair a partition table:

Although it is sometimes possible to repair an uninitialized disk, it is not recommended. You need to have an above average understanding of partitions. Also, as repairs write to the disk, it is very well possible you make the situation worse.

TestDisk website here
DiskPatch website here


The post You must initialize the disk before Logical Disk Manager can access it appeared first on JPEG Repair | Photo Recovery | File Recovery | Video Recovery.


RAW data recovery

$
0
0

RAW can mean several things with regards to data recovery; ‘You can recover your RAW photos from a SD Card with a RAW file system using RAW file recovery’.

With regards to file and photo recovery, RAW data recovery can refer to three different things:

  1. The recovery method; RAW vs. file system based recovery
  2. It may refer to the state of the file system, ‘RAW’.
  3. The file format of a digital photo.

RAW data recovery: the recovery method

There are two methods to recover deleted and lost data

The first method is file system based: The recovery software will try reconstructing a virtual file system from which files can be copied to another drive. By working out the start of the file system and the cluster size the locations of files as defined in file entries can be determined. File names can be determined from those entries. It is often also possible to reconstruct the directory structure.

File system based file recovery from a RAW file system

File system based file recovery from a RAW file system. File names and directory structure are recovered too.

RAW data recovery being the second method on the other hand ignores the file system and scans a drive for characteristics for specific file types. These characteristics are often specific byte sequences which are common for one specific file type. The byte sequences are called magic bytes or magic numbers. This method only allows for recovery of files the software knows magic bytes for.

RAW data recovery software is also referred to as a carver and the process of detecting and recovering photos using this method as carving.

To a degree RAW data recovery software may still try to find a solution for the start of the file system and the cluster size as it can greatly reduce scan times.

File system based vs. RAW data recovery
File system based file recovery RAW data recovery
Recovers directory structure Does not recover directory structure
Original file names and attributes File names are not recovered
Success depends on state of file system Even recovers data if file system is FUBAR
Recovers any file type Only recovers specific file types
File system can be reconstructed within minutes* Slow
No need to scan the entire volume Entire drive needs to be scanned
File fragmentation is no issue** Fragmented files are problem

* – Depends on file system state
** – Depends on file system

File system: State of the file system is RAW

In order for an OS to be able to work with a file system, it has to parse the file system structure. Starting with the boot record the OS works out the start of the file system and cluster size. The boot record also contains pointers to clusters containing following structures such as the master file table (MFT). The whole process is also referred to as ‘mounting’.

Now if the boot record for example contains an invalid value for cluster size the OS will fail to find the MFT. If Windows is unable to mount the file system due to corruption in one of these meta structures is designates the file system as ‘RAW’.

Very often file system based recovery is possible however on memory cards used in cameras the RAW recovery method is some times required and more successful.

RAW photo file format(s)

RAW photos are files that contain all sensor data from the often more expensive digital cameras For example Canon cameras produce CR2 files, Nikons store their sensor data in NEF files and Sony cameras in files with the extension ARW. They tend to be quite large. You can look at those files as digital negatives that require further processing using a RAW developer to produce a nice picture of an acceptable file size.

RAW photos are often specific to a brand of camera but often based on the TIFF file structure.

RAW data recovery software or a carver in action

RAW data recovery software or a carver in action

If RAW photos need to be recovered from a hard drive the best way to do this is by using file system based recovery software. In many situations you can also use this generic software to recover data from memory cards. This being said, memory cards is where the RAW recovery method can really shine. If file system based recovery software fails to recover your lost or deleted photos from an SD Card then do not give up before having tried RAW file recovery.

The post RAW data recovery appeared first on JPEG Repair | Photo Recovery | File Recovery | Video Recovery.

In the wild corrupted photos and their fixes

$
0
0

There’s a couple of data recovery and photo related forums I visit on a regular basis. And being part of those communities, being entertained, learning a thing or two, I sometimes give back by repairing a few corrupted photos. Note: I do not own the copyright to these images!

All these photos were repaired using JPEG-Repair only or JPEG-Repair to edit RAW bitstream data and a photo editor (Paint.net) for post processing. This basically means anyone can repair images corrupted in similar ways! Doing this yourself can save you a lot of money compared to have my JPEG repair Service repair them for you because what you pay for in a large part is my time. Many of below examples are category 3 repairs:

Category 1. If only header damage, repair cost would be $5.95 per file (one jpeg repair unit) Category 2. If JPEG data is interrupted by local bit corruption repair cost would be $5.95 – $17.85 per file (2 -3 jpeg repair units) Category 3. Severely corrupted JPEG data, repair starts at 3 x JPEG repair unit = $17.85 per file (starts at 3 jpeg repair units)
JPEG with damaged or corrupt header Bit corruption in JPEG data Severe bit corruption, multiple bit corruption in JPEG data

As an example, this photo I recently repaired for a customer at the cost of $17,85:

Corrupt JPEG repair in 3 steps.

Easy repairs of corrupted photos (JFIF/JPEG)

For these I used nothing but JPEG-repair, no additional post processing with a photo editor was required.

Source: DP Review forums (photography forums).  These photos had the tiniest amount of bit corruption in the JPEG bitstream which I removed and stuffed with zero bytes to re-align image data.

A few corrupt bytes in JPEG bitstream

Source: DP Review forums. These JPEGs had groups of corrupted bytes in the bitstream. Due to the fact it’s a JPEG with restart markers effect on the photo was very ‘local’. Normally this type of corruption propagates through the rest if the image (distorted color from point of corruption until end of photo). JPEG restart markers contain this type of corruption to a limited group of MCUs (MCU is a small group of pixels that are encoded as a unit. Often 8 x 8 pixels, 8 x 16 pixels or 16 x 16 pixels).

Invalid JPEG markers in JPEG with restart markers. Repair: easy.

More complex repair of  corrupted JPEGs

Source: Reddit r/estoration.

For these I used JPEG-Repair to remove byte corruption and Paint.net for clone stamping parts I had to cut. You can see colors distort and image data shifts in two blocks. Using JPEG-Repair I removed those 2 corrupted areas and stuffed zero bytes to make up for lost bytes. I used Paint.net for filling in missing parts using the clone-stamp tool and to correct colors.

Corrupt photo due to 2 areas of damaged bytes in encoded and compressed data stream

Source: Reddit r/techsupport. Again 2 corrupted areas which were cut using the JPEG-Repair bitstream editor. Paint.net’s clone-stamp tool was used to fill in missing data and to correct color.

3 areas with corrupt bytes. Repair using JPEG-Repair and photo editor

Source: Reddit r/estoration. Two corrupt areas were removed from the RAW data using JPEG-Repair. Paint.net was used to clone stamp missing data and to correct colors (still slightly off I see now).

2 corrupted areas. Corrupt byes removed and stuffed with zero bytes. Post processing using Paint.net.

Source: DP Review forums. One large corrupted area affecting several lines of MCUs. The JPEG-Repair bitstream editor was used to cut the corrupt data, missing data was filled with zero bytes. Using a photo editor I then filled in missing data using clone-stamping and to correct colors.

One huge corrupted area in JPEG data.

What I mean to demonstrate with these examples is that this type of corruption in photos can be repaired despite a common answer appears to be the contrary. It is true that these are close to impossible to repair using PhotoShop like editors because it’s the underlying data that is corrupt. It means standard photo restoration techniques fall short as they work with the data that is available. JPEG-Repair is a tool designed to remove the corrupt data.

The post In the wild corrupted photos and their fixes appeared first on JPEG Repair | Photo Recovery | File Recovery | Video Recovery.

Aiseesoft Data Recovery – Short review: Waste of time

$
0
0

Aiseesoft Data Recovery was spammed in https://www.reddit.com/r/datarecovery/, on offer was a free license. So that was a nice opportunity to test the abilities of the software. I paste my comments on the software after subjecting it to a short test, more or less in verbatim.

Aiseesoft Data Recovery – short review

Okay. As Aiseesoft Data Recovery is free and it is file recovery software gave a short test drive. Indeed license is still valid/accepted but software prompts me to download an update. This may invalidate the license, a commonly used ‘trick’ with free give-aways. So I didn’t update.

I only tested file detection and directory tree reconstruction. If files are restored in original state depends more on file contents not being overwritten and state of the file system than on the tool used. IOW, if a tool can detect the MFT entry it can only recover the clusters this entry points to. There isn’t much you can screw up there.

Verdict: not worth your time. For undelete type recovery it’s useless, there are free alternatives that are better, Recuva to name one. Unformat type recovery (unformat, RAW file system etc.) it is not capable of.

Scenario: Undelete, NTFS, approx. 1000000 files on volume.

I assume this is what the Recycle Bin option is supposed to do, find deleted files. Path of all files found starts with c:\$recycle.bin\etc.. So it appears this is not a full scan for deleted files and you’ll only be able to recover files that at some point were in the Recycle Bin. Many files that get deleted don’t go this route (programmatically deleted, SHIFT deleted, files too large for recycle bin etc.). Also files are not recovered with original file path using the Aiseesoft ‘undelete’ option. Scan takes 7 minutes.

In contrast an undelete tool like this, also free, I wrote it many years ago scans the MFT for deleted files and restores file with the full path. It also finds approximately 100 times more files in tested scenario. Scan takes 5 minutes.

ReclaiMe only needs 2 minutes to scan (!) to list all current AND deleted files. Click search > set to deleted only > ready to copy all deleted files with a single click.

Scenario: Unformat type recovery, NTFS, approx 1000000 files.

Goal of such an exercise is to determine if the tool can reconstruct a virtual file system. File system is detected as RAW by Windows, but there’s only little damage to the file system. This means as much as any tool should be able to do this.

I forgot to set the clock, Aiseesoft needed well over an hour. Found about 50% of total files, only 285000 or so in original directory tree. Rest was sorted by file type. IMO the result is useless.

Aiseesoft Data Recovery only finds a fraction of what's on a largely intact drive

Aiseesoft Data Recovery only finds a fraction of what’s on a largely intact drive

In contrast, ReclaiMe again finished scan in under 2 minutes, all files neatly sorted in the original directory tree.

Conclusion

Yes folks, there IS a difference and there is a thing as GOOD file recovery and GARBAGE file recovery software. Aiseesoft Data Recovery is not in the good category.

The post Aiseesoft Data Recovery – Short review: Waste of time appeared first on JPEG Repair | Photo Recovery | File Recovery | Video Recovery.

The corrupt JPEGs that weren’t corrupt

$
0
0

Often I am asked to repair JPEGs that can be opened but don’t display correctly. Many of those look okay for some part, but turn into a grey area at some point. Repairing these files (or recovering them as we’ll see) isn’t always straight forward and sometimes requires some detective work.

Half grey photos

In general this means:

  1. part of the image data is missing or
  2. all data is there but part of image data is not processed by the photo viewer/editor due to corruption.

Part of image data missing.

Often seen after data recovery from corrupt memory cards due to file fragmentation. As this image data simply isn’t there it can not be repaired either.

In the case below however, the files were not the result of a failed recovery but of inconsistencies in the file system. As I will demonstrate, all file data was actually written to the memory card, but for some reason the file system contained erroneous information about the files.

Part of image data not processed.

The photo partially displaying means the header of the JPEG is intact. Almost always the footer is intact as well.

This is mostly caused by corruption in the image data. Depending on the amount of corrupt data, this can often be repaired by editing image data using utilities I developed and a hex editor. In short the process is:

  • Get rid of invalid markers that stops the viewer from processing the entire image file. This results in the viewer rendering the entire, although corrupt picture.
  • Get rid of corrupt data. This is a process of trial and error. Using the info from the first step (invalid marker data) I delete data from the image stream and view the results. I do this until I get a more or less normal picture, where colors look correct.
  • Stuff bytes to account for deleted data. This is necessary to correctly align the picture.
  • Use an inpaint tool and/or photo editor to clean up the picture.

The corrupt JPEG that wasn’t corrupt

Recently I received a bunch of images that were partially okay, partially grey. They were not the result of being recovered using file recovery software. I examined the files and none of my ‘tricks’ worked. Then I noticed something obvious that I initially missed. The files were so darned small. Also, they are all without a JPEG end marker (FF D9) in the hex editor.

When sorting the files by size it showed that the smaller the file, the larger the grey area. These files weren’t corrupt, they simple were incomplete. I can not repair that, no one can. However that does not mean all is lost yet.

Working with my customer, I had him make an image of the original memory card, and upload it. An image file is a sector by sector copy of the card. Thus it contains the entire file system and everything stored on it.

Not the picture is corrupt, the file system is …

I loaded the card image into a tool that can interpret file systems, FAT32 in this case. It confirmed the too small file sizes (according to the file system). So, for example a 4 MB (estimated by comparing against same resolution images) was only 2 MB or even smaller.

As I was able to extract previews from all files (JPEG) that all show the correct image, I assumed that at one point the sensor did capture all data, the full frame. I decided that our only chance was to see if we can discover the full images on the card without relying on the file system.

The method to do this is carving: Detect images based on their characteristics rather than using the file system. Initially I use simple header/footer carving as it is faster than advanced carving.

Success! For whatever reason, the full image was written to the card but incorrectly entered in the file system. This is encouraging enough to now process the SD Card image again using advanced carving (using JpegDigger) to retrieve as many files as possible.


The post The corrupt JPEGs that weren’t corrupt appeared first on JPEG Repair | Photo Recovery | File Recovery | Video Recovery.

Unknown or invalid JPEG Marker

$
0
0

If you get a Unknown or invalid JPEG Marker this means one of two:

  1. The photo viewer or editor encountered a JPEG marker it isn’t familiar with.
  2. The JPEG file is corrupt.

To rule out cause 1, your photo viewer editor doesn’t recognize a certain JPEG marker, update your software and if that does not help, try different software. Of none of those help resolve the error then we can assume the cause is the JPEG file being corrupt.

Reference: Full list of JPEG Markers.

JPEG Markers

JPEGs consist of different sections. Each section contains information and data which is needed to decode an image. A section starts with a JPEG Marker which tells what data is inside the section, and the length of the section. In order to be able to display a JPEG a photo viewer or editor needs to process this chain of sections. As each JPEG marker tells the length of a section the software knows where to find the next JPEG marker and section. A JPEG marker is always a combination of 2 bytes, the first byte being 0xFF.

Unknown or invalid JPEG Marker, JPEG markers and sections.

What each ‘section’ or marker contains is outside the scope of this post and quite irrelevant, really. Basically there are 3 scenarios that can cause a JPEG marker to be invalid:

  • JPEG Marker is corrupt
  • JPEG Marker length value is corrupt
  • JPEG Marker in encoded/compressed image data

JPEG Marker is corrupt

Here you can find a more or less complete list of JPEG markers. It’s a combination of two bytes, the first byte always being 0xFF. If 0xFF for whatever reason changes to any other value the photo viewer or editor you’re using will error out.

JPEG Marker length value is incorrect

The 2 bytes for storing the length of the section allows the software to find the next marker. If this is value is incorrect it will not be able to. It will jump to an incorrect byte address, interpret whatever data it finds there as a JPEG marker, which in fact isn’t a JPEG marker and may report an unknown or invalid JPEG Marker.

JPEG Marker in encoded & compressed image data

You may have noticed that the JPEG Marker for the actual encoded and compressed image data section does not specify a length. Image data is a stream that simply is decompressed and decoded until an End Of Image (EOI) marker, 0xFF D9 is encountered.

I already explained Normally you will not find any JPEG Markers inside the encoded data with the following exceptions:

  • 0xFF, 00. As the result of encoding and compression data may actually be value 0xFF (255 in decimals) we need a way to store this and separate from an actual JPEG marker. To do so it must be followed by a value of 0x00.
  • 0xFF, Dn where n is a value from 0 to 7, for example 0xFF, D5. These are so called Restart Markers.

Repairing an Unknown or Invalid JPEG Marker

Let’s for now call all JPEG markers proceeding the actual payload, the image data the JPEG header. Then we have two situations, the Unknown or invalid JPEG Marker is either encountered in the JPEG header or in the image data.

In header

Unknown or Invalid JPEG Markers in the header portion can be recognized by the JPEG image not being displayed at all.

By far the easiest method to repair an Unknown or Invalid JPEG Marker in the header portion is by replacing the header entirely with an intact header, shot with the same camera and settings the the corrupt file.

You can do this using a HEX editor or by using software designed for this such as my JPEG-Repair tool.

If you are familiar with using a hex editor, copy the portion of a healthy JPEG right from the start (FF D8) to the latest instance you can find of byte pair FF DA. This is your healthy header.

Open the corrupt file and find the latest instance of FF DA you can find in the corrupted file. Overwrite anything before it with your intact header.

In image data

If an unknown or invalid JPEG Marker is encountered in the image or scan data, the photo viewer or editor will probably stop decoding that point. Result is very often the image is grey from that point on.

Using a hex editor you’d basically need to find any FF xx byte combination that is not FF 00 or FF Dn (n being 0 to 7) in the compressed image stream and modify it. Alternatively use JPEGSnoop to help you find the invalid JPEG markers.

JPEGSnoop can help identify unknown or invalid jpeg markers in scan data

JPEGSnoop can help identify unknown or invalid jpeg markers in scan data

If you are looking for a more automatic method you can use my tool JPEG-Repair.

Select the patch tool in JPEG-Repair to automatically remove unknown or invalid JPEG Markers from the image data.

Select the patch tool to automatically remove unknown or invalid JPEG Markers from the image data.

In JPEG-Repair select the Patch tool, then slick the folder icon and select the corrupt JPEG. Click Repair.  Repairs are done automatically and result is saved to a new file. It is likely additional repairs are required because in my experience 9 out of 10 times it is not just the bytes that result in invalid JPEG markers that are corrupt.

Possible causes

In practice I see 2 main causes for this type of errors:

  1. File is entirely corrupt and contains no (JPEG) data at all. If you open these files in a hex editor you see only zeros or a repeating byte pattern (example: FF FF FF etc.).
  2. Uncorrectable read errors. Commonly the files I am repairing are one some kind of flash memory (USB key, SD Card, CF Card etc.). One ‘flipped’ bit that can not be ECC corrected is all it takes to change 0xFE to 0xFF. (in binary: 1111 1110 vs. 1111 1111) which is the difference between a valid value in the image stream and a JPEG Marker.

The post Unknown or invalid JPEG Marker appeared first on JPEG Repair | Photo Recovery | File Recovery | Video Recovery.

Repairing JPEGs encrypted by ransomware (STOP (Djvu))

$
0
0

A case was brought to me as JPEG files encrypted by ransomware. This article shows repair of JPEGs that fell victim of ransomware. This particular ransomware only encrypts part of the file. Due to this the JPEG header and some 150 KB of JPEG data are lost. Using a reference file and after weeding encrypted data we can repair these photos.

Now, as this article is not to give anyone false hope, understand that fully encrypted files can not be ‘repaired’. The only repair possible is by decrypting the files.

JPEG files encrypted by ransomware?

The customer that sent me the files told me the JPEGs can not be opened and no previews or thumbnails are visible. He suspects the JPEGs are encrypted by ransomware.

Entropy however suggests files are at least not fully encrypted. About the 150 KB of each file contains non JPEG data. I didn’t investigate IF this was actual encrypted data, but indeed some ransomware encrypts only the start of files. The rest of the data looks like JPEG data entropy-wise and byte-histogram-wise.

Now, then it does not matter if the first 150 KB was encrypted or corrupted by whatever other data, if we have a valid header from a reference file we can use JPEG-Repair and see if we can make remaining JPEG data visible again.

The encrypted portion of the data is lost. As this was only 150 KB of 6MB+ JPEG data a small strip of the photos can’t be repaired / recovered.

Only after I repaired 2 files I discovered that indeed the photos were partially encrypted by the STOP (Djvu) ransomware by using the ID-Ransomware website. I still document this case because the decryption tool does not work with all variants of the ransomeware. It may also help with other ransomware that only partially encrypts files.

Repair using JPEG-Repair involves the following:

1. Append a valid header to corrupted file. This header must match JPEG data as closely as possible. So sample file needs to be shot with the same camera with settings matching as closely as possible. After appending the header and removing invalid JPEG Markers from the encrypted / corrupt data (done automatically by JPEG-Repair) the photo can be rendered. The corrupt portion is clearly visible:

JPEG files encrypted by ransomware - repair 1

2. Remove corrupt data from file (whether it’s encrypted or some other corruption). This could be done with a hex editor if amount of corrupt data is known. If unknown it is quite easy using JPEG-Repair as it provides you with visual feedback. The more corruption we remove, the better the photo looks:

JPEG files encrypted by ransomware - repair 2

3. Post processing in photo editor. After the color looks more or less natural you can start re-aligning the image and copy it to the clipboard.

JPEG files encrypted by ransomware - repair 3

Import the clip board into your photo editor to cut remaining corrupt parts and adjust color, brightness etc.:

JPEG files encrypted by ransomware - photo editor

Using the ID-Ransomware tool and uploading a JPEG I was able to determine we are dealing with the STOP (Djvu) ransomware for which a decryption tool is available. This tool does however not cover all variants of the ransomware. In those cases and other cases involving partial encryption you can use JPEG-Repair for repairing JPEGs encrypted by ransomware.

The post Repairing JPEGs encrypted by ransomware (STOP (Djvu)) appeared first on JPEG Repair | Photo Recovery | File Recovery | Video Recovery.

Alternative method for half grey or truncated JPEG photo repair

$
0
0

There are various examples on this website of repairs of half grey or truncated JPEG images. In those cases all image data is actually present, but due to an error or corruption only a part of it is visible. If data is simply missing because for example the file is partially overwritten or cut-off, repair is impossible.

Modern high resolution JPEGs often embed a reasonably sized preview JPEG. Merging the available part of the full resolution JPEG with the embedded preview can lead to acceptable results. Although not able to compete with an actually repaired photo, something is better than nothing.

Example: Truncated JPEG 6000x4000 merged with 1620x1080 preview

Example: Truncated 6000 x 4000 JPEG merged with 1620 x 1080 preview

Steps to repair half grey / truncated JPEG with embedded preview:

  1. Extract Preview from corrupt JPEG using JPEG-Repair
  2. Open both truncated file and extracted preview in photo editor
  3. Resize preview to match dimensions corrupt file
  4. Select intact part corrupt image
  5. Paste selected part into preview image

Exact steps depend on the photo editor you prefer to use. I use Paint.net (free). For extracting the embedded JPEG from the truncated JPEG I use JPEG-Repair.

With regards to JPEG-Repair: Use the extract tool to get the embedded preview JPEG. of course, the larger the preview, the better the result you can expect. It will never be able to complete with the original or an actual repair. So in case of half grey and truncated JPEG files, always try repairing it first.

Reasons for missing data:

  • File is partially overwritten (JPEG-Repair will most likely show low entropy for the file data)
  • File is truncated (size considerably smaller than similar intact files)

In this video I demonstrate this repair method:


The post Alternative method for half grey or truncated JPEG photo repair appeared first on JPEG Repair | Photo Recovery | File Recovery | Video Recovery.


Recover fragmented, non-contiguous, incomplete photos from a memory card using JpegDigger

$
0
0

Fragmentation on FAT file systems and file recovery

Video that goes with this post can be viewed here: https://youtu.be/9uGbQ6Buoac

Most memory cards in camera’s are formatted with a flavor of the FAT file system (FAT32, exFAT). A property of FAT file system is that after deletion or formatting the card, non contiguous or fragmented files can not be recovered in one piece. This is due to the file system meta data pointing to individual clusters of a file is zeroed.

Typical symptoms are that such files are half grey or a combination of different images. If this combination of images are images with a different resolution, recovered files may look something like this:

Two fragments of different photos with different resolutions in one file

JpegDigger can try to ‘defrag’ such files automatically but this is rather complicated so it may get it wrong:

  • It correctly needs to identify the exact point where the initial fragment ends.
  • It correctly needs to pick the missing piece(s).

To have JpegDigger try this, in advanced options enable the ‘Gap carving’ option.

Manually finding the missing links step by step

In case JpegDigger gets it wrong you can manually try to puzzle fragments belonging to one file together. To do so:

  • DISABLE the ‘Gap carving‘ option.
  • Enable the ‘Attempt file repair‘ option.
  • From the file list select the file you want to reconstruct and double click the preview.
  • Clusters assigned to the file are already ‘ticked’. If the bottom of the file looks ‘weird’, or corrupt remove bottom clusters until the non showing part of the image is a solid black block (see example below).
  • Now it’s a matter of trial and error. Select a few clusters and click ‘Test’.
  • Do additionally selected clusters look like a part of the file? If not, deselect them and try a next batch of clusters.
  • If fragment looks like it belongs to the file add clusters above and below the clusters you’re testing until the picture looks complete.
  • Once complete click ‘Save‘.

The number of clusters you can try is limited to the ‘scan window’ JpegDigger moves over the drive from start to end. Normally the initial fragment is close to the start of this window. The scan window is larger than the actual file, so from within this window, or area you can select clusters.

JpegDigger scan window from which you can select virtual clusters

You can only select clusters within the scan window, first virtual cluster is numbered 1. So the remainder of the non contiguous file has to be within reach of the scan window. Virtual clusters are aligned to actual block size.

There is no guarantee the missing clusters are within the window or that they even exist. Clusters originally allocated to the file may have been overwritten since deletion for example. However experience (and even scientific research) suggests that IF additional fragments still exist that they are often close to the initial fragment.

Let’s see what reconstructing a fragmented file looks like:

Reconstructing a fragmented, deleted file

First remove clusters from bottom of first fragment until you have a nice ‘clean cut’.

Reconstructing a fragmented, deleted JPEG photo - 2

With the bottom cluster of the fragment un-ticked we get a solid black block. Garbage has been removed from the first fragment. Some times you will need to remove more than one cluster.

Reconstructing a fragmented, deleted JPEG photo - 3

Now skip some clusters and then tick a few, click Test. Evaluate if clusters are part of the photo. if not, un-tick and move on. Skip 10 or 20 clusters and repeat.

Reconstructing a fragmented, deleted JPEG photo - 4

This looks like a part of our photo! Now ‘grow’ the block of clusters top and bottom. At the top until it’s attached to the first fragment.

Reconstructing a fragmented, deleted JPEG photo - 5

In this case I only needed to grow the top by one cluster. In other cases you may need to add more. Then move on to bottom and grow the file until the photo looks complete.

Reconstructing a fragmented, deleted JPEG photo - 6

Once the file looks complete click Save to keep the file. As soon as you close the virtual cluster list and move on to the next file, JpegDigger will forget about it.

The post Recover fragmented, non-contiguous, incomplete photos from a memory card using JpegDigger appeared first on JPEG Repair | Photo Recovery | File Recovery | Video Recovery.

New features in JPEG-Repair and JpegDigger and what sparked them

$
0
0

To add new features in JPEG-Repair or JpegDigger it is not like me sitting and wondering ‘what will I add now’?

It is much a demand driven process. Real cases present themselves and if they can’t be solved by my own tools or 3rd party tools I consider if it’s worth the effort of adding functionality to my tools to solve a specific problem. Some times it is trivial stuff.

JPEG-Repair changes and what inspired them

For example a user of JPEG-Repair asked me if I ever considered adding a cross-hair to the magnifier. In fact I have but it was fiddly and it never made it to release. There are several conversions done from the pointer on the preview and the magnifier and probably due to rounding off errors I never got it right. Current implementation isn’t one I am 100% happy with but it appears to work. Rather than me trying to get it exactly right, the user can calibrate the cross-hair (double click magnifier).

Other recent changes in JPEG-Repair were mostly the result of me needing it to repair a number of JPEG and CR2 photos that were the victim on STOP / Djvu ransomware.

JpegDigger changes and what sparked them

Recent changes in JpegDigger were result of more serious matters. JpegDigger is a recovery tool, but most cases it ends up getting used in were came in as ‘repair’ cases. In the most recent version lots of changes were made that aren’t very visible. For example I repaired errors in the block size and start of data area detection, and also stream lined code that handled no file system detected situations.

The more visible changes and what prompted me to add those:

Canon CR3  detection: I was contacted by a photographer with a card full of corrupt CR3 files. CR3 files weren’t detected yet because unlike CR2 they’re not TIFF based. In fact thy look more like movies. Current CR3 detection is based on experiments with only a limited number of files.

Deep scan: User of Recuva tried to repair corrupt CR2 files on a memory card by recovering them. Now under circumstances you actually can repair files by recovering them and I wrote several posts on it. But in those cases you need a tool that ignores the file system, so a carver like JpegDigger. Anyway, since Recuva didn’t repair the files it the Recuva user decided to format the drive and try again. Result was:

  • Files could not be recovered using the file system (due to the format).
  • Files could not be recovered using a carver due to header corruption of the files.

A carver normally looks at the first few bytes of a block, a block being a sector or a cluster. Files normally start at block boundaries. I decided it should be possible to still get at least the embedded full resolution JPEGs from the corrupt, lost CR2 files, however these are NOT block aligned. Hence the deep scan.

Virtual cluster list: Is actually a result of wanting to be able to view the clusters the gap carve feature selects. That and I have been intrigued by this article for a long time, I wouldn’t mind adding a similar feature to JpegDigger. So then adding the option to tick clusters yourself and process that selection then was a logical next step. I then tried this on 10 or so real world memory cards and it worked surprisingly well! I was able to recover quite a large number of fragmented files within a reasonable amount of time.

The post New features in JPEG-Repair and JpegDigger and what sparked them appeared first on JPEG Repair | Photo Recovery | File Recovery | Video Recovery.

JPEG-Repair, no SOS detected

$
0
0

A common error message that JPEG-Repair reports is ‘no SOS detected’. I have written several posts and made videos to repair JPEG photos in case the Windows photo viewers report errors:

The old Windows photo viewer: File appears to be damaged, corrupted or is too large.

The new Windows Photos: It looks like we don’t support this file format.

The errors indicate the viewers can not read the JPEG header, it’s a catch all, broad message that can mean a lot of things. JPEG-Repair allows you to transplant the header of an intact file, a reference file, to a corrupt file. For this you use the ‘Repair header’ tool. A prerequisite for the Repair header tool to work is that the corruption is limited to the JPEG header. If corruption extends beyond that JPEG-Repair will report ‘no SOS detected’. A common comment below my posts and videos on the topic is people getting this error message. Pretty frustrating, I get that.

Let’s look at what it means – no SOS detected

A JPEG is divided into several sections, all preceded by a JPEG Marker. The JPEG marker tells the software that reads the file what it will find inside a particular section, and it also tells the size of the section. Using this size info it can find the next section. So it’s really a chain of sections with no real header. I personally refer to all sections preceding the actual image data as ‘the header’.

The section containing the actual image data starts with the SOS or start of scan marker (FF DA in hex). It is the only marker that does not contain a size value! Instead the SOS section contains a compressed and encoded stream of image data. The software is supposed to keep decoding this data until it reached the EOI marker (FF D9 in hex).

JPEG markers - JPEG file structure

JPEG-Repair giving the error ‘no SOS detected’ basically means the corruption extends beyond the ‘header’ and the tool being unable to locate the start of the JPEG image stream. And therefor it can not determine what to glue an intact header onto.

It’s however not the only thing JPEG-Repair reports, it also reports ‘entropy’ for the files affected by the error:

JPEG-Repair shows the file size and entropy. This information can give you hints if a file can be repaired or not. Common issues you can get from these values are:

  • File size 0 KB. This file can not be repaired which may be obvious. But also with larger files you may want to compare the file size against the average file size for photos produced by your camera with similar settings. If the file is considerably smaller it is unlikely it can be repaired.
  • Entropy: Entropy is a measure of chaos and JPEGs, largely consisting of compressed data usually have an entropy value between 7.6x and 7.9x. If this value is considerably off then the file probably does not contain JPEG data and can therefor not be repaired.

IOW, the message no SOS detected in itself gives very limited info. You need to combine it with the other data to reach a meaningful conclusion. If the file size appears to be valid and entropy is between 7.6x and 7.9x the file still may be repairable.

How to repair a file with error no SOS detected

You can not batch process these files, you will need to repair these file by file. Repair requires manual interaction.

After you determined the file has a valid size and entropy you need to:

  • Select the patch tool
  • Enable ‘append option’
  • Select the corrupt file
  • Select the reference file
  • Click OK
  • Click Repair

JPEG-Repair will process the file and get rid of any invalid data that will prevent the file from rendering. The file will probably misaligned and colors may look off. The following video shows a repair from start to end:

The post JPEG-Repair, no SOS detected appeared first on JPEG Repair | Photo Recovery | File Recovery | Video Recovery.

Professional grade data recovery software on a budget

$
0
0

Who does not want it, professional grade data recovery software on a budget when you have an immediate need for it? Forget Stellar, forget the Disk Drill and RecoverIt!

Although I have been and still am an enthusiastic advocate for ReclaiMe File Recovery, I try to keep an open mind and test other tools regularly. Although I have known about DMDE (DM Disk Editor and Data Recovery Software) for a while, I was always reluctant to endorse it; My major objection was (and is) that is tool is able to edit a disk. The unwritten rule in data recovery is that you do not write to the patient drive. So DMDE violates that rule.

Another objection is that, specially compared to ReclaiMe, the tool is difficult to use. It offers a lot, but you pay for that in the form of having to deal with a complex interface. Whether that’s worth it is something each user has to decide for her or him self.

Like ReclaiMe, DMDE offers broad file system support. It also offers support for multi-disk (RAID) configurations. Both are very effective in recovering data. Both tools often can reconstruct a complete directory tree without the need for an extensive (long) scan. But in many aspects it is the opposite of ReclaiMe. ReclaiMe is exceptionally easy to use and does most things automatically. It requires no above average PC knowledge. Using DMDE is more difficult and requires some knowledge about file systems and disk partitioning. ReclaiMe is quite pricey, DMDE is very inexpensive.

The complexity may scare you or you may be very attracted to it. I know many data recovery technicians love it and use it for their logical data recovery jobs.

DMDE Download Page Download trial version
DMDE Unlimited license for personal use $48 – non expiring license for personal use

DMDE disk editor and data recovery

DMDE features in a nutshell: DMDE supports NTFS, FAT12/16, FAT32, exFAT, Ext2/3/4, HFS+/HFSX, ReFS, APFS (Beta) and runs on Windows, Linux, macOS, DOS. It’s RAID reconstructor virtually reconstructs RAID supporting RAID-0, RAID-1, RAID-4, RAID-5, RAID-6, as well as custom striping, delayed parity, JBOD/spanned disks, automatic detection of RAID configurations.

DMDE disk editor and data recovery

As soon as you start DMDE it offers an overwhelming amount of information ..

As soon as you start DMDE it offers an overwhelming amount of information! There is many menus and sub menus and often there are multiple ways to for example pull up a specific configuration window. The good news is however, that for standard recovery scenarios you don’t need even half of it. I’ll give you an example:

To recover data that was deleted, or to recover data from an accidentally formatted volume, you only need to:

  • Identify the volume or partition
  • Right click that volume or partition
  • From pop-up menu select Open Volume
DMDE select partition

Right click volume or partition and select Open volume from pop-up menu

In 9 out of 10 cases DMDE will now show the directory tree from which you select and recover files. This is just an introduction to DMDE, I will add more scenarios soon in a separate post.

DMDE website and direct purchase

DMDE Download Page Download trial version
DMDE Unlimited license for personal use $48 – non expiring license for personal use


The post Professional grade data recovery software on a budget appeared first on JPEG Repair | Photo Recovery | File Recovery | Video Recovery.

My r/datarecovery subreddit FAQ

$
0
0

For over 20 years I have been developing, been involved in development of and supporting data and file recovery software. Some very specific incidents sparked my interest in data recovery and then I wanted to find out how data was stored and lost on and from hard drives. The first tools I wrote were DOS tools and could do stuff like rebuilding partition tables and boot sectors. Today I am still as fascinated by this topic as I was over 20 years ago.

I dedicate some of my time helping people with data loss related issues in public forums such as Quora and Reddit. I see a lot of the same question being asked and the same mistakes being made over and over.  One of the central issues is, which data recovery software to use and data recovery software fails to recover my data. This post can be regarded as my FAQ for the r/datarecovery Reddit sub. I am creating this so I can link to it or copy/paste from it.

Unlike 20 years ago, today people have a lot (too many?) options to chose from, there are literally thousands of file recovery tools, all claiming to be unique and the best. Personally I am convinced that about 90% of those are not worth your time and money. The software I recommend in this FAQ are tools that are commonly used by professional data recovery techs to recover data from logical issues. Their Tech and Pro editions are used daily to deliver commercial data recovery services. Based on these daily and real world data recovery cases these tools are constantly improved.

This FAQ is a work in progress.

Disclosure: Some, but not all, of the below links are affiliate links. This means that if decide to purchase a product linked to, I will receive a small commission. The order in which I list the tools is random. So IOW the top one is not the one I regard ‘best’ or highest recommended.

Can I recover my data?

In general you can only recover data yourself if the drive is functioning without error. If you have reason to believe the drive may be physically damaged (because it was dropped, or fluid spilled over it, power surge, or it makes unusual noises etc.) it is advised you do not power up the drive even.

In general IF data recovery is possible this is due to the fact that the data (files) is not really deleted. However due to file system corruption or intentional actions (file deleting, formatting) pointers, meta data pointing to your files, are removed.

Often the data and even a good portion of this meta data is still available. File recovery software can scan the drive for this meta data and attempt to reconstruct the file system.

Even if all meta data is lost some data may still be recoverable, but information normally stored in the file system such as filenames and the directory structure can not be recovered.

Many of the available file recovery tools can do both.

SSD Warning: Consider that if you’re using an internal SSD and a modern OS, apart from ‘pseudo’ deleting files by modifying file system meta data, the OS also sends a TRIM command to the drive. In practice this means the data is truly deleted. In general assume that if you delete data or format a drive on an SSD, the data can not be recovered.

The r/datarecovery sub links to a very useful data recovery flowchart.

Create a clone or disk image

Before even attempting to recover any files, a data recovery professional will always first create a sector-by-sector copy of the patient drive. It is good practice that you do this too. The SubReddit links to a guide for using ddrescue.

Recommended data recovery tools

Consider that a drive may fail at any time during DIY recovery attempts! If the data is worth more than say $300 don’t take any chances. A professional data recovery lab with experienced technicians and professional equipment is by far your best option.

TL;DR IMO Reclaime is by far easiest to use. DMDE is most inexpensive but can be overwhelming if new to this. This is my personal opinion.

[Mac/Win/Lin] are possible host OS-es. Most of these tools support Mac, Windows and Linux file systems regardless the OS they’re operated from. Support file systems {FAT|NTFS}. Visit manufacturer website for full specs because I don’t list all supported file systems. FAT means all variants of FAT file system, EXT means all EXT versions.

These tools are capable of creating and processing sector-by-sector disk images. It is always recommend to create a clone or disk image. Ideally the drive you need to image is attached via SATA (NOT USB). If a disk is ill behaving due to for example many bad sectors it is recommended to use a tool like ddrescue or HDDSuperClone to clone the disk.

These tools (apart from GetDataBack) support multi-disk sets or RAIDs. You need to follow the appropriate procedures. Scanning separate member disks is of no use.

R-Studiowww.r-tt.com. Used by many pros for logical data recovery. Moderately difficult to use. [Mac/Win/Lin]{FAT|NTFS|UFS|HFS|HFS+|APFS|EXT}

GetDataBackwww.runtime.org. For some issues and file systems the goto tool for quite a few data recovery pros. Moderately difficult to use. [Win]{FAT|NTFS|HFS+|APFS|EXT}
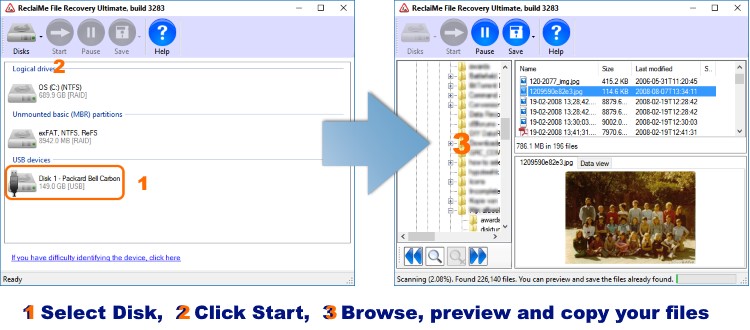
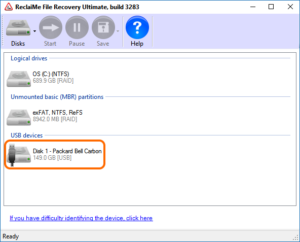
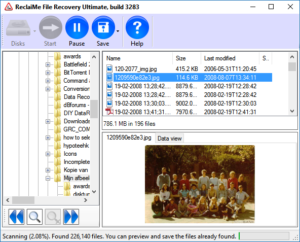
ReclaiMewww.reclaime.com. This is the end user version that’s based on the Pro version used by pros. Super easy to use. [Win]{FAT|NTFS|UFS|HFS|HFS+|APFS|EXT|BTFRS|XFS}

UFS Explorerwww.ufsexplorer.com. Goto tool for many pros. Moderately difficult to use. [Win]{FAT|NTFS|UFS|HFS|HFS+|APFS|EXT|BTFRS|XFS}

DMDEwww.dmde.com. Another favorite for some pros. If you’re new to this, this tool can be quite overwhelming. Be warned that this tool can write to patient drive. [Mac/Win/Lin]{FAT|NTFS|HFS|HFS+|APFS|EXT}

FileScavengerwww.quetek.com. Not mentioned very often but definitely worth it IMO. Quite simple to use in standard situations. [Win]{FAT|NTFS|UFS|HFS|HFS+|APFS|EXT|BTFRS|XFS}

Evaluating results of a scan

In general it is advised to first run the demo / trial version. In most tools the file save option is disabled. Most tools can be upgraded to the full version without having to restart the tool. Most tools offer a session load feature so you do not have to scan again even after restarting the tool.

To evaluate scan results I suggest the following: Locate a folder containing larger images and preview say 20 of them. When recovering data from a formatted volume, pick non deleted ones. If the images look fine the tool has successfully determined vital volume parameters such as the cluster size. In general if those 20 are okay it is likely most files are.

DMDE: Does not have an image preview however, the trial allows you to save up to 4000 files (but not sub-folders).

Free data recovery software

There are two categories of ‘free’ tools:

  1. Many manufacturers of software advertise free software. In reality these tools are limited versions of software you need to pay for. For example the amount of data you can save is limited to 1 GB. As a rule of thumb it is my advise to avoid this type of software. Some free software such as Recuva is fully functional but may attempt to install additional software.

  2. Free and open source with no strings attached.

Some free tools worth mentioning

Testdisk & PhotoRecwww.cgsecurity.org , free and open source. These are command line tools and can be useful in certain situations. However these tools are not generic and all-round file recovery tools. Testdisk primarily is a partition recovery tool. It writes to the patient disk. PhotoRec is a file recovery tool that can recover individual files, however it does not recover file names or the directory structure. There are considerable drawbacks compared to commercial tools.

Recuvawww.ccleaner.com/. Free for non commercial use. This is primarily an undelete tool. It can also ‘unformat’ provided a volume was formatted with the exact same file system and parameters such as clustersize.


The post My r/datarecovery subreddit FAQ appeared first on JPEG Repair | Photo Recovery | File Recovery | Video Recovery.

Viewing all 281 articles
Browse latest View live